https://www.androidinfotech.com/wp-content/cache/breeze-minification/js/breeze_fb25648fffbc026887b3f5568150934c.js
https://www.androidinfotech.com/wp-content/cache/breeze-minification/js/breeze_4f5634e28ffa0afa354df460a566423a.js
https://www.androidinfotech.com/wp-content/cache/breeze-minification/js/breeze_686215446491b38afdc3a9ed01706d6a.js
https://www.androidinfotech.com/wp-content/cache/breeze-minification/js/breeze_2a78c915e1a8cec7aabc1295f795a8e3.js
https://www.androidinfotech.com/wp-content/cache/breeze-minification/js/breeze_ac180449be005ffd1764c41d247f4145.js
https://www.androidinfotech.com/wp-content/cache/breeze-minification/js/breeze_c9d042a31574c25223fb5d0004ec4955.js
https://www.androidinfotech.com/wp-content/cache/breeze-minification/js/breeze_29a08ecbadc8237767dae3fa3e9201a4.js
https://www.androidinfotech.com/wp-content/cache/breeze-minification/js/breeze_248f7dde98ee84f5d0e0572bf6113434.js
https://www.androidinfotech.com/wp-content/cache/breeze-minification/js/breeze_6ca7ec7af215b135db2a9c094ca5867a.js
https://www.androidinfotech.com/wp-content/cache/breeze-minification/js/breeze_15e485e21aa2b07e1bc40661dd19a793.js
https://www.androidinfotech.com/wp-content/cache/breeze-minification/js/breeze_bb39b39988adcb535f21e8614d90d3f5.js
  • Skip to primary navigation
  • Skip to main content
  • Skip to primary sidebar
  • Skip to footer
Android Infotech

Android Infotech

Android Tips, News, Guide, Tutorials

  • News
  • Root
  • Firmware
  • Applications
  • Knowledge
  • Tutorial
  • I’m Bored
  • Deals
  • Donate
  • 🔎Search
Home » Root » Root Samsung Galaxy J2 SM-J200G 5.1.1 Lollipop

Root Samsung Galaxy J2 SM-J200G 5.1.1 Lollipop

by Selva Kumar A Leave a Comment

Now a Days Android Go devices come with Just 1 GB RAM, but The Samsung Old Device with same 1 GB RAM? Really? But We can survive with this RAM if you optimize correctly with Hibernate apps and Uninstall unwanted System apps. You can easily root your Samsung Galaxy J200G using CF-Root. This method is Successful in most of the times. After you root your mobile, you can install TWRP using TWRP official app, or you can flash using the flashify app. But we here use Direct TWRP method. Using TWRP method is wise. Because you need TWRP for flashing custom ROMs like that.
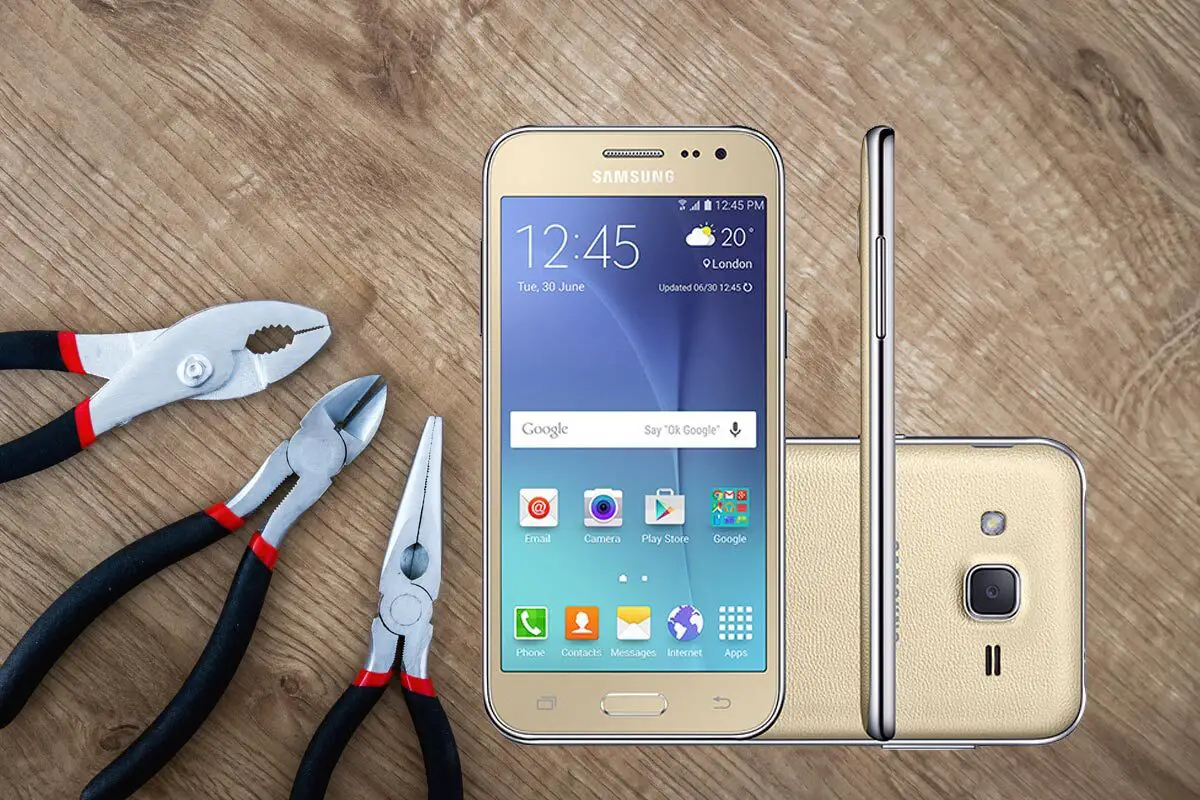
Samsung Galaxy J2 With Tools

Table of Contents

  • Why Should I root my Samsung Galaxy J2?
  • Root Samsung Galaxy J2
    • Pre-Ready For Rooting
    • Flash TWRP using ODIN
    • Install SuperSu in your Samsung J2 using TWRP
  • Troubleshoot- SEANDROID ENFORCING FRP Lock
  • What More?

Why Should I root my Samsung Galaxy J2?

Yes. Can you live with it 1 GB RAM? Really? You can’t. Asides from removing the bloatware apps that occupy a chunk of reasonable space on your device, there are other things you’ll gain as a result of rooting your smartphone. If you wish to install a custom firmware/ROM root access is needed. Also, for some specific applications to run on your Galaxy device, root access is required equally.

Root Samsung Galaxy J2

Pre-Ready For Rooting

  • Make sure your device battery is charged above 50%.

    Buy Samsung Galaxy S22 Ultra from $6.46/mo for 24 Months with Eligible Trade-In.
    Buy Samsung Galaxy Z Fold 5 from $25/mo for 24 Months with Eligible Trade-In.
  • Backup your current files and data, just in case (save them on external storage).
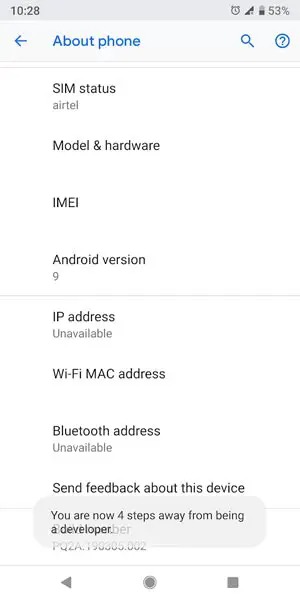
Enabling developer option

  • Enable USB Debugging Mode in your mobile. To do this; go to settings >>> about >>> Tap on the “Build Number” 7-10 times consistently to enable “Developer Options,” then go to the “Developer Options” and enable USB Debugging Mode. There is no complicated process in the J2 since it is an older device.

  • Download and install the Samsung USB driver to your computer system.

  • Also, download the ODIN software. Select above Lollipop version in the ODIN list. Install ODIN in your PC.

  • Download SuperSu.Zip and Copy it to Your Phone Memory.
  • Download and save the TWRP File. We should use only the .tar file. We can’t flash the .img file using ODIN.

Also Read-  Root Samsung Galaxy A7 2018 SM-A750F/G/N Android 10 using TWRP and Magisk

Flash TWRP using ODIN

Samsung J2 Download Mode

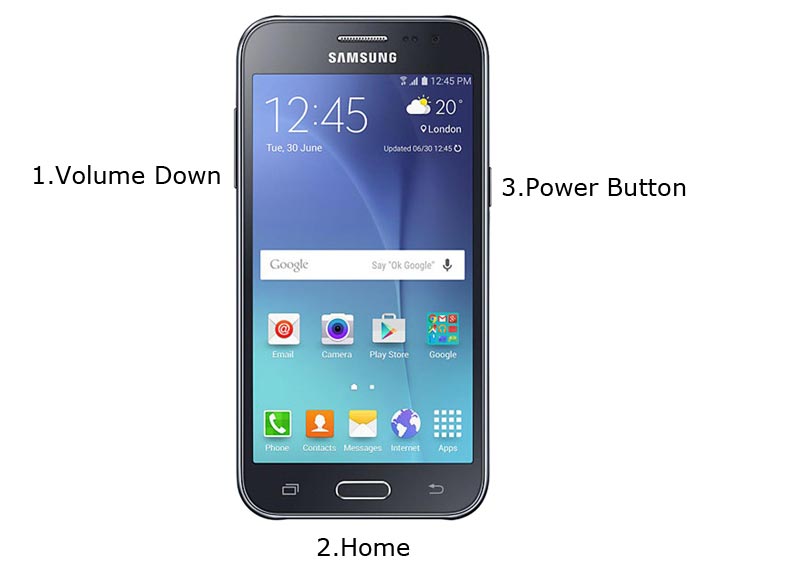
  • Restart the device. Then, enter into Download mode. To do this; press and hold down the Volume Down + Home+ Volume Up buttons at the same time for some time.
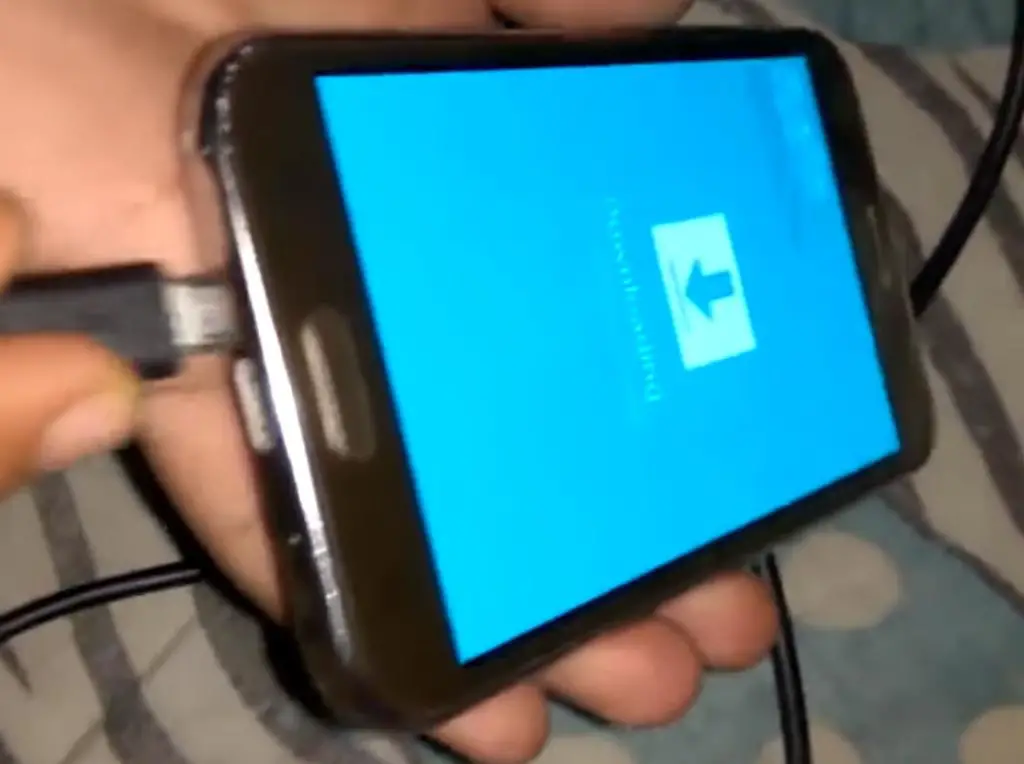
Samsung J2 Warning message

  • Press the Volume Up button to continue when you see the warning message.

  • Now, connect the J2 mobile to the computer via USB cable.

  • Launch the Odin app on your computer. If the device is detected by this app (Odin), it will show you a message that reads – added!!!
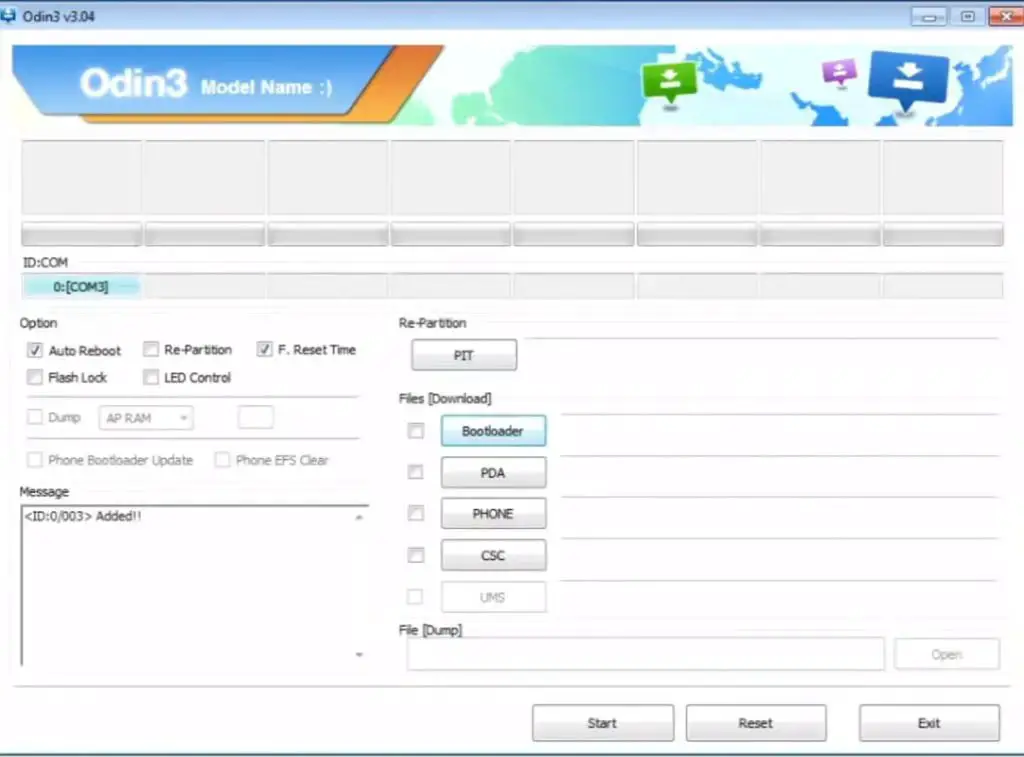
ODIN Added Message


However, if the device is not correctly connected to the PC, you won’t see this message. So, you have to check the USB cable if it is good and reconnect the device.

  • After connecting the Samsung device, click on the PDA/PA button to browse/search and get the TWRP from where you saved it on your PC. Also, navigate to “options” and tick the Auto Reboot.
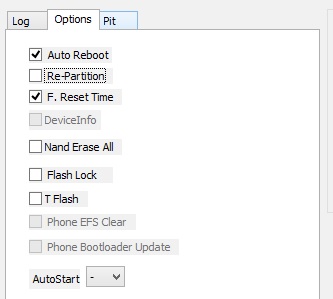
Odin Auto Reboot

  • Click on “Start”

  • Once the file is loaded into the device, reboot your device.

  • Kudos, you have just Installed the TWRP App on your Samsung Galaxy J2.

Install SuperSu in your Samsung J2 using TWRP

  • Boot it Into recovery mode->Volume Up+ Home +Power Button.
  • Now it Will Boot into TWRP Recovery Mode.
  • Select Wipe->Advance Wipe->Select Cache Data.
  • Return to Home of TWRP select Install.
  • Select SuperSu.Zip.
  • After the Installation Reboot Your Mobile.
  • Now You Can Find the SuperSu in your Mobile Applications.

However, the SuperSU app will appear among your installed app so you can manage Root permissions. If you wish, you can install Magisk Manager APK to manage Superuser Permissions. Just download and install Magisk manager app as you do for Normal APK files.

Troubleshoot- SEANDROID ENFORCING FRP Lock
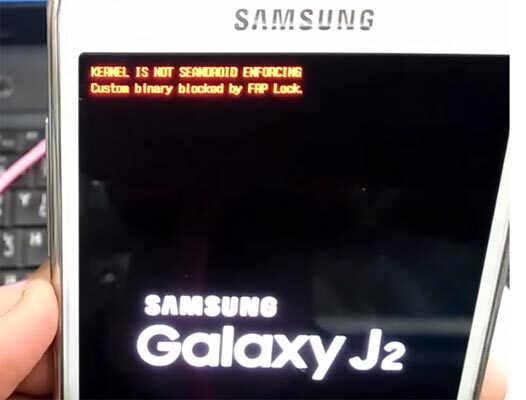
Samsung J2 FRP Lock

Hmm… It can happen. You can easily remove it by Flashing firmware. You can check your firmware here. Flashing firmware is the same as the above steps. Instead of CF-Root file flash downloaded firmware file.

Also Read-  Activate eSIM on a Samsung Galaxy S20/Plus/Ultra

What More?

We can Root Samsung J200g using Two methods. Here I explained with the TWRP method. If this method doesn’t work or you have any difficulties, you can try the CF-Auto-Root Method. If you face any problems, comment below, we will try our best to resolve the issue.

Selva Kumar A

Selva Kumar is an Android Devices Enthusiast, Who Can Talk and Write About Anything If You Give a Hint About the respective devices. He is a Computer Science Graduate and Certified Android Developer, Making His Career towards this Technology. He is always eager to try new Android devices — not only Software level but Hardware-level Also. Beyond this, He is a Good Swimmer, Guitarist.

Related Posts:

  • Fix Samsung Galaxy A03s SM-A037F/G/M/U/U1/W Stuck on Boot Start screen…
  • Fix Xiaomi Poco F4 GT Stuck on Boot Start screen logo
  • Fix Xiaomi Poco F4 Stuck on Boot Start screen logo
  • Fix Xiaomi Redmi 9 Prime Stuck on Boot Start screen logo
  • Fix Xiaomi Redmi 10A Stuck on Boot Start screen logo
  • Fix Xiaomi Redmi Note 11T Pro 5G Stuck on Boot Start screen logo
Share This Post:

Filed Under: Root Tagged With: Magisk, Samsung, TWRP

Reader Interactions

Leave a Reply Cancel reply

Your email address will not be published. Required fields are marked *

This site uses Akismet to reduce spam. Learn how your comment data is processed.

Primary Sidebar

Join With Us

Deal of the Day

Samsung Galaxy S22 Ultra For $6.95/mo at Samsung Online Store.

Recent Posts

Person Paying in Shop with GPay

Fix Google Wallet is not working After Android 14 QPR1 Beta Update

Amazon Prime Video in TV and Mobile

Amazon to Introduce Ads on Prime Video Starting 2024

Nio Phone in Hands

Car Maker Nio launched a Smartphone with Flagship Mobile Specs

Samsung Galaxy A14 5G Unlocked Screen

You can grab the Samsung Galaxy A14 5G for Free with Cricket Wireless

Twitter Bird Animation

Twitter X is Going to charge Monthly Subscriptions for All

Advertisement

Footer

Copyright © 2023 AndroidInfotech.com, All Rights Reserved, Android is a trademark of Google Inc. All contents on this blog are copyright protected and should not be reproduced without permission.

  • Subscribe
  • Sitemap
  • About Us
  • Contact Us
  • Privacy Policy
  • Disclaimer
  • Our Image License
  • Hosted on Google Cloud
  • Ad Partner Ezoic
  • Corporate Office
https://www.androidinfotech.com/wp-content/cache/breeze-minification/js/breeze_0b67af9b5e7eaf668572c5872e0a3991.js
https://www.androidinfotech.com/wp-content/cache/breeze-minification/js/breeze_10c8ebfc985be71922c88c536624e417.js
https://www.androidinfotech.com/wp-content/cache/breeze-minification/js/breeze_9fea4d7be4145aaf0b98e6bc26687eaa.js
https://www.androidinfotech.com/wp-content/cache/breeze-minification/js/breeze_bd5f648f4fa75f28b17faffe66049687.js
https://www.androidinfotech.com/wp-content/cache/breeze-minification/js/breeze_9fea4d7be4145aaf0b98e6bc26687eaa.js
https://www.androidinfotech.com/wp-content/cache/breeze-minification/js/breeze_298bb463888a4276688a783f0f14c700.js
https://www.androidinfotech.com/wp-content/cache/breeze-minification/js/breeze_4e33182e2093ae1e10398f4680e95185.js
https://www.androidinfotech.com/wp-content/cache/breeze-minification/js/breeze_65c117ad5675ffd71bda6e068672b02f.js
https://www.androidinfotech.com/wp-content/cache/breeze-minification/js/breeze_67730c4dee29c8c0aee3f6289e1840f0.js
https://www.androidinfotech.com/wp-content/cache/breeze-minification/js/breeze_3ad3f79c0e62e6ea273ad8067486c53f.js
https://www.androidinfotech.com/wp-content/cache/breeze-minification/js/breeze_bbeb0fe39fcd2520fb8f28a9f601feb2.js
https://www.androidinfotech.com/wp-content/cache/breeze-minification/js/breeze_7add861bd61e0f9c7452c4d864327152.js
https://www.androidinfotech.com/wp-content/cache/breeze-minification/js/breeze_c5d933e64f51e5b6b9a7f83b7ee58b8d.js
https://www.androidinfotech.com/wp-content/cache/breeze-minification/js/breeze_36940f971edc44a61404200d3372d203.js
https://www.androidinfotech.com/wp-content/cache/breeze-minification/js/breeze_eff53e0ce28ff3edbd034c1ed04d312c.js
https://www.androidinfotech.com/wp-content/cache/breeze-minification/js/breeze_94bc4228bb5941670e191e40a6bc44bd.js
https://www.androidinfotech.com/wp-content/cache/breeze-minification/js/breeze_90d3f5906ac4aeced0717b1bf97aa91c.js