• Skip to primary navigation
  • Skip to main content
  • Skip to primary sidebar
Android Infotech

Android Infotech

Android Tips, News, Guide, Tutorials

  • Applications
  • Knowledge
  • I’m Bored
  • Opinion
  • Tutorial
  • Root
  • Firmware
  • Daily Deals
Home » Root » Root Samsung Galaxy A3 2017 SM-A320F/FL/Y Nougat, Oreo 8.0 using TWRP

Root Samsung Galaxy A3 2017 SM-A320F/FL/Y Nougat, Oreo 8.0 using TWRP

Last updated on April 19, 2019 By Selva Kumar A 39 Comments

Samsung Galaxy A3 2017 devices still receiving regular patch updates from Samsung. But, there is no chance for a Pie update. You are using this device for more than two years, and you can notice some lag or Sudden hand when you receive a call or a lot of group messages in Whatsapp. The problem is the update consist of some Bloatware. They keep adding non-usable apps. We should remove those apps, to improve the performance of your device. If you face issues like this, I advise you to root your device using the below steps. Follow steps one by one. Don’t skip any steps.
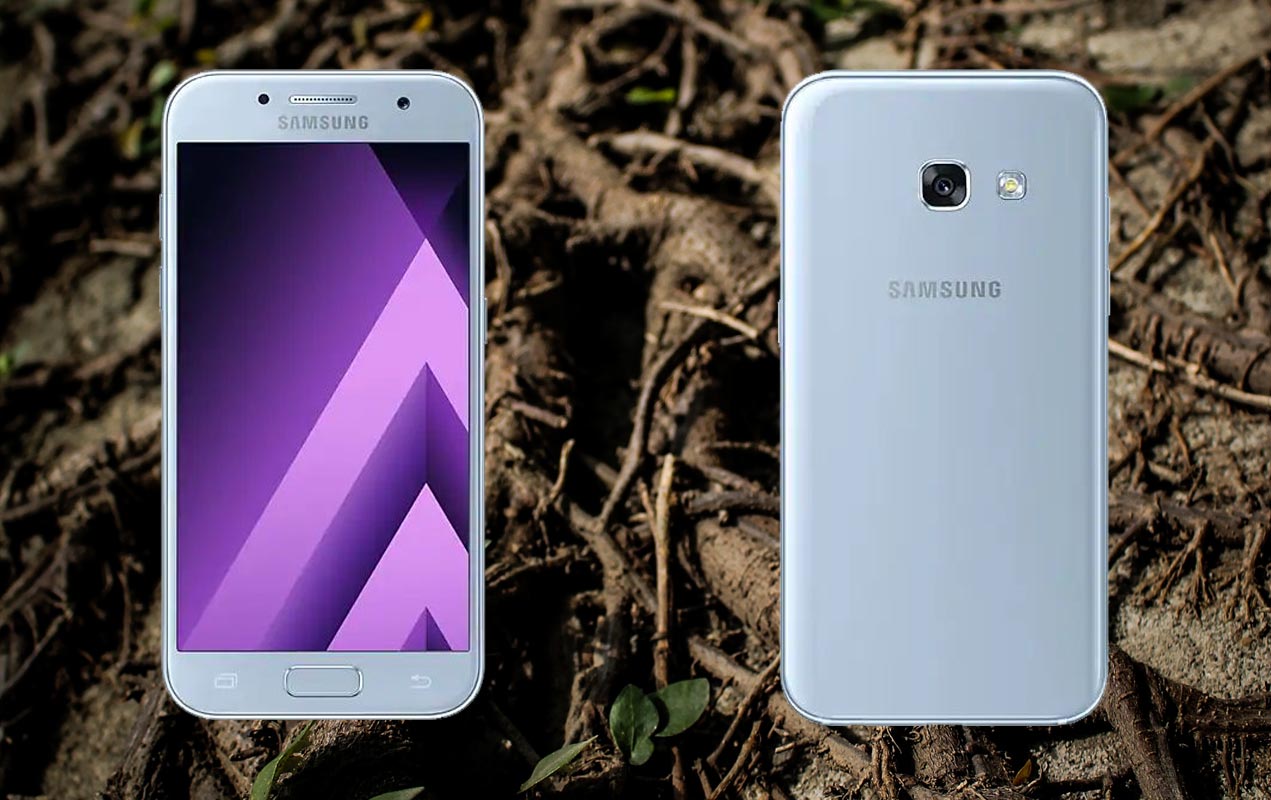
Samsung Galaxy A3 2017 with plant root background

Table of Contents

  • Why should you Root Samsung Galaxy A3 2017?
  • How to Root Samsung Galaxy A3 2017 ( SM-A320F / SM-A320FL / SM-A320Y )
    • Things to check out for;
    • Pre-Requirement Steps
    • Flash TWRP using ODIN
    • Install Magisk in your Samsung Galaxy A3 2017 using TWRP
  • What More?

Why should you Root Samsung Galaxy A3 2017?

You have only 2 GB of RAM. It is not enough for Normal usage. Samsung is rolling out updates 60-90 Days Interval, But your warranty is already expired. It has a good Exynos 7870 Octa-Core processor. If we optimize correctly with correct Custom OS after rooting, we can see a lot of Improvements. So, after rooting, I can expect a Lag-free experience? Probably. Also if we hibernate and eliminate a lot of unwanted apps, and optimize some apps, your device is hardware limited. But, within these limits, we can enhance the performance by 20-40% compared with your old usage. If you use Lite weight Custom ROMs, you can expect a 50-60% improvement in performance based on what custom OS you are choosing.

How to Root Samsung Galaxy A3 2017 ( SM-A320F / SM-A320FL / SM-A320Y )

Samsung Galaxy A3 2017 comes with a flexible bootloader other than Verizon devices. Verizon devices come with a locked Bootloader. This means that different smartphone variants can be easily rooted. Also, the device can accept to install TWRP recovery or any other custom recovery file/app alike.

TWRP recovery is a custom recovery file that must be installed on Samsung Galaxy devices because you can root them successfully. In this article, we explained the easiest method to follow and install TWRP recovery on Samsung Galaxy A3 2017. However, the tool required for rooting this device is the Magisk App.

With the help of TWRP Recovery, you can quickly flash the latest version of Magisk into your Samsung Galaxy A3 2017 to gain root access. Before sharing the tutorial, you may want to know that, with the TWRP recovery present on your device, you can easily install any custom ROM or firmware. Does it seem complicated? Relax, everything will be explained succinctly in bullets.

Things to check out for;

  • Check your device model number.

  • Select TWRP Based on the mobile model number.
  • Make sure your device battery is charged above 50%

  • Backup your current files and data, just in case (save them on external storage).

Pre-Requirement Steps
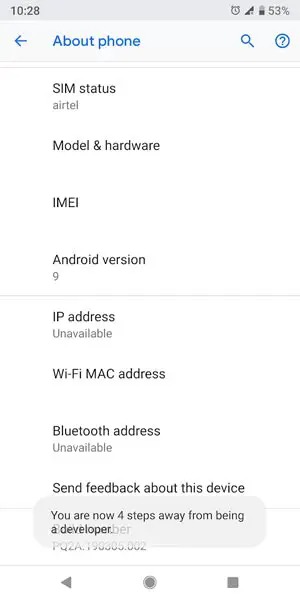
Enabling developer option

  • Enable USB Debugging Mode and OEM Unlock in your mobile. To do this; go to settings >>> about >>> Tap on the “Build Number” 7-10 times consistently to enable “Developer Options,” then go to the “Developer Options” and enable USB Debugging Mode and OEM Unlock. There is no complicated process in the Samsung Galaxy A3 2017.

  • Download and install the Samsung USB driver to your computer system.

  • Also, download the ODIN software. Select the above Oreo version in the ODIN list. Install ODIN on your PC.

  • Download Magisk.Zip (Latest Version) and Copy it to Your Phone Memory.
  • Download and save the TWRP File. Please select the correct model number TWRP file.

  • SM-A320F
  • SM-A320FL
  • SM-A320Y

Flash TWRP using ODIN

Samsung A3 2017 Download Mode


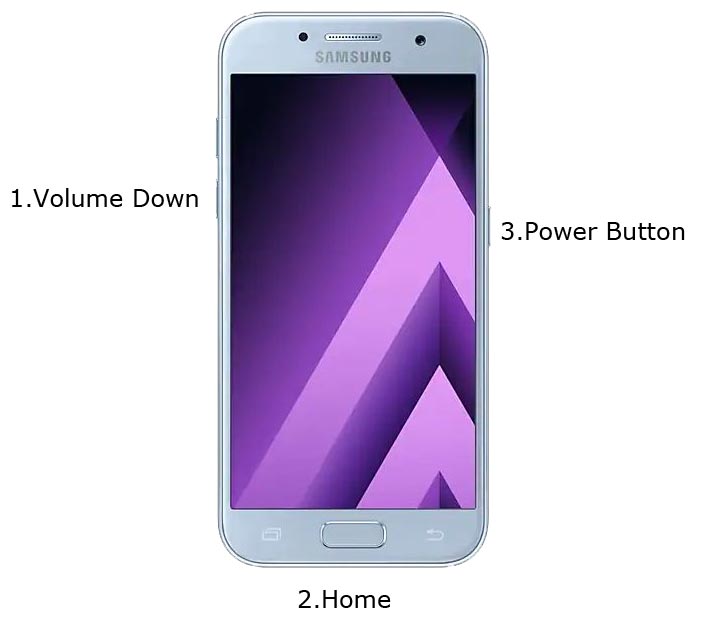
  • Restart the device. Then, enter into Download mode. To do this; press and hold down the Volume Down + Home+ Power buttons at the same time for some time.
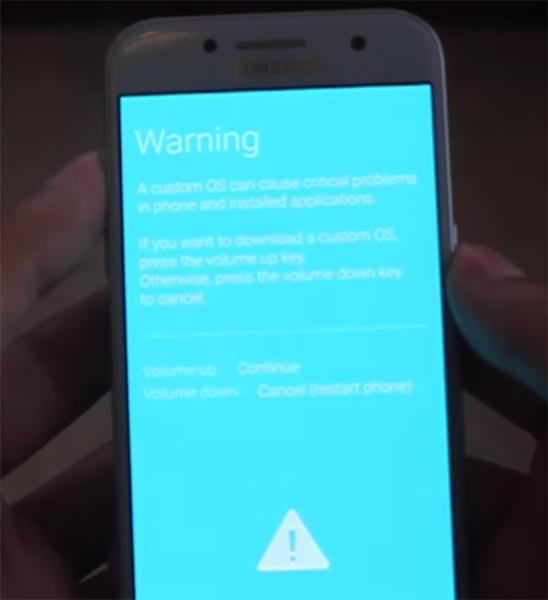
Samsung A3 2017 Download Mode Warning Screen


  • Press the Volume Up button to continue when you see the warning message.

  • Now, connect the Samsung Galaxy A3 2017 mobile to the computer via USB cable.

  • Launch the Odin app on your computer. If the device is detected by this app (Odin), it will show you a message that reads – added!!!
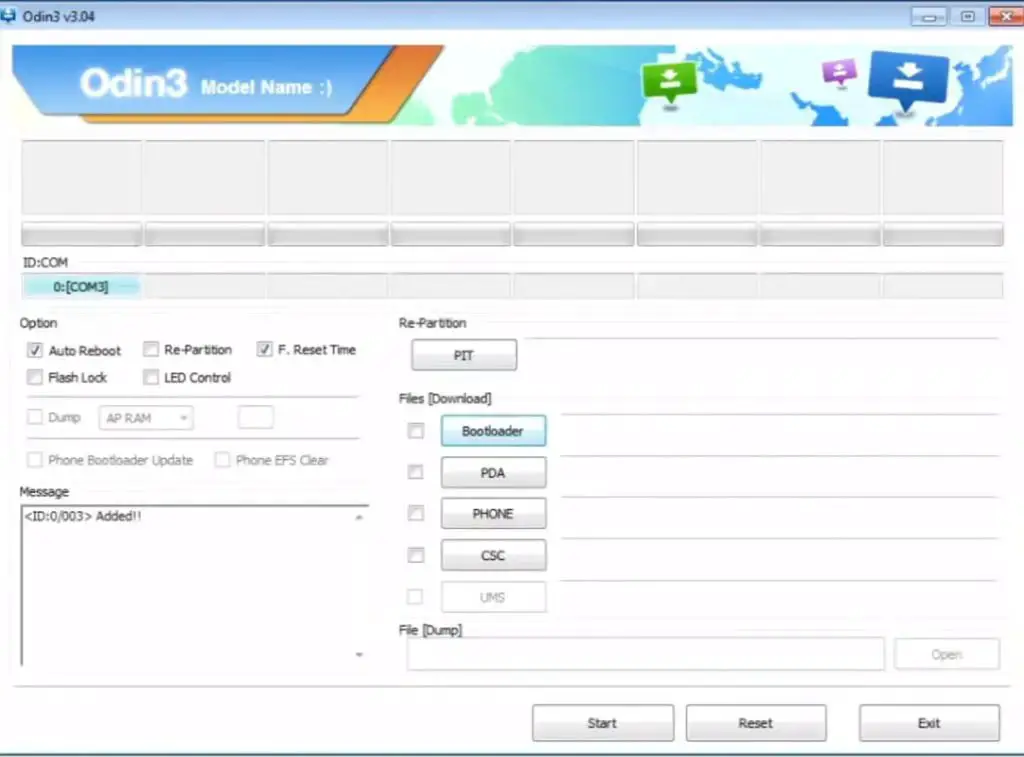
ODIN Added Message


However, if the device is not correctly connected to the PC, you won’t see this message. So, you have to check the USB cable if it is reasonable and reconnect the device.

  • After connecting the Samsung device, click on the PDA/PA button to browse/search and get the TWRP from where you saved it on your PC. Also, navigate to “options” and Un-tick the Auto Reboot.
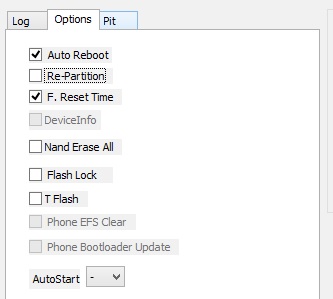
Odin Auto Reboot

  • Click on “Start”

  • Once the file is loaded into the device, reboot your device.

  • Kudos, you have just Installed the TWRP on your Samsung Galaxy A3 2017. If you installed TWRP, Don’t turn on your mobile. Immediately, move to Magisk Installation steps.

Install Magisk in your Samsung Galaxy A3 2017 using TWRP

  • Boot it Into recovery mode->Volume Up+ Home +Power Button.
  • Now it Will Boot into TWRP Recovery Mode.
  • Select Wipe->Advance Wipe->Select Cache Data.
  • Return to Home of TWRP select Install.
  • Select Magisk.Zip.
  • After the Installation Reboot Your Mobile.
  • You can also install Magisk Manager in your Mobile Applications. You can check the Root status, using Root Checker.

What More?

Samsung Galaxy A3 2017 is a Mid-Range phone; Samsung releasing only security patch updates from their side. But, If you use Lite weight Custom Roms, you can expect a considerable performance Improvement. So, If you have little knowledge in tech, I advise you to Root and uninstall some unwanted apps. You can also flash some Custom ROMs. If you flash Custom ROM, check what is working and what is not working. It is wise to use Some Official Custom ROMs like Lineage.

Selva Kumar A

Selva Kumar is an Android Devices Enthusiast, Who Can Talk and Write About Anything If You Give a Hint About the respective devices. He is a Computer Science Graduate, Making His Career towards this Technology. He is always eager to try new Android devices — not only Software level but Hardware-level Also. Beyond this, He is a Good Swimmer, Guitarist.

Related Posts:

  • Send WhatsApp messages to Yourself (To Your Number)
  • Troubleshoot Samsung Galaxy A50 SM-A505 Freeze Not Responding issues
  • Unfreeze Not Responding Non-Removable Battery Android Mobiles
  • Don't get Banned by Whatsapp
  • Root Samsung Galaxy J5 Pro 2017 SM-J530F/FM/G/GM/Y/YM Pie 9.0…
  • Download Samsung Galaxy A3 2017 SM-A320F/FL/Y Oreo 8.0 Stock Firmware
Share This Post:

Tagged With: Samsung

Reader Interactions

Comments

  1. josh says

    June 6, 2019 at 10:08 pm

    did not work, still had stock recovery

    Reply
    • Selva Ganesh says

      June 7, 2019 at 1:43 pm

      Did you get “PASS” Message in ODIN?

      Reply
  2. Leonid says

    July 1, 2019 at 12:33 am

    “Select Wipe->Advance Wipe->Select Cache Data.”
    I can see on this step these menu options only:

    – Reboot system now
    – Reboot to bootloader
    – Apply update from ADB
    – Apply update from SD card
    – Wipe data/factory reset
    – Wipe cache partition
    – Mount /system
    – View recovery logs
    – Run graphics test
    – Power off

    I have chosen “Wipe cache partition,” then I was returned to the same menu.

    “Return to Home of TWRP select Install.”
    This I don’t understand, how can I get to this?

    Reply
    • Selva Ganesh says

      July 1, 2019 at 12:25 pm

      You boot into stock recovery. Un-tick Auto Reboot in ODIN and flash TWRP again.

      Reply
  3. Leonid says

    July 1, 2019 at 2:06 am

    “Once the file is loaded into the device, reboot your device.”
    But Odin reboots the phone itself, I can’t reboot it.
    “If you installed TWRP, Don’t turn on your mobile. Immediately, move to Magisk Installation steps.”
    But the phone is already rebooted, i.e. turned on.
    From this point, discrepancies begin between my results and your steps. After “Boot it Into recovery mode”, I don’t see “TWRP Recovery Mode”, I see the system menu that I described before.

    Reply
  4. Môûrad says

    July 11, 2019 at 3:07 am

    samsung galaxy a3 2017 live demo unit???

    Reply
    • Selva Ganesh says

      July 11, 2019 at 6:17 am

      We will try to provide a live video in the future.

      Reply
  5. stan says

    October 28, 2019 at 4:51 pm

    Will this wipe the phone?

    Reply
    • Selva Ganesh says

      October 28, 2019 at 6:39 pm

      We Didn’t deal with the User Data. But, It is better to backup first.

      Reply
  6. jre says

    November 29, 2019 at 4:33 am

    TWRP cant read *.zip extension.

    Reply
    • Selva Ganesh says

      November 29, 2019 at 11:56 am

      Maybe the file is broken. Download the file without Network Interruption.

      Reply
  7. Gerardo v. says

    December 10, 2019 at 9:12 pm

    I want to root my phone, can anyone that has experienced full success comment? I love this phone, want to install Dolby atmos or resurrection remix rom. Thank you, thank you, thank you.

    Reply
    • Selva Ganesh says

      December 11, 2019 at 11:46 am

      The above method can support up to Oreo version. Take Complete Backup before the root process.

      Reply
  8. mumblee says

    February 15, 2020 at 4:55 pm

    Hello,
    SM-A320FL
    Android Oreo
    Odin 3.12.7
    but… Odin fails!
    Any hope to flash successfully another way?
    PS: screen capture on-demand.

    Reply
    • Selva Ganesh says

      February 15, 2020 at 8:16 pm

      Uninstall any screen recorder app that is running in the background. You can install those apps, after the root process.

      Reply
      • mumblee says

        February 16, 2020 at 9:36 pm

        Er… There isn’t any screen capture app running in the background, either on the pc or the phone!
        I just did a screen capture of Odin window after it fails.
        Any other suggestions?

        Reply
        • Selva Ganesh says

          February 17, 2020 at 9:24 pm

          Can you mention your build number? If you need only root access, you can try with the Magisk only method also.

          Reply
    • Ken Lee says

      March 1, 2020 at 9:33 pm

      here also Odin fails

      Reply
      • Selva Ganesh says

        March 2, 2020 at 2:06 pm

        Can you mention the further error message?

        Reply
        • zblerx says

          June 14, 2020 at 12:31 am

          when starting in Odin, it fails and the phone displays
          “KERNEL REV. CHECK FAIL. DEVICE:3, BINARY:1”

          Reply
          • Selva Ganesh says

            June 14, 2020 at 3:47 pm

            I think you flashed wrong file. What is your current build number?

  9. Michael says

    September 25, 2020 at 3:41 pm

    Hi,

    I also tried to root the phone and got into the same troubles as Leonid. I uploaded the TWRP with no error. During restart, I pressed Vol up + Power + Home, and the default Android recovery showed up instead of TWRP recovery mode. I also used the right twrp file. Is there a solution?

    Reply
    • Selva Ganesh says

      September 25, 2020 at 9:14 pm

      Can you mention your current build number?

      Reply
  10. Bela says

    September 30, 2020 at 4:29 am

    I followed all the steps (using the latest versions of everything, i.e., USB-drivers/Odin/TWRP), but I get a similar error message as zblerx reported June 14th (only one digit differ 5 vs. 3) on display:
    KERNEL REV. CHECK FAIL DEVICE:5, BINARY:1
    Odin states the following:
    Added!!
    recovery.img
    RQT_CLOSE !!
    Complete(Write) operation failed.
    All threads completed. (succeed 0 / failed 1)

    My A3 runs the following:
    Android:
    8.0.0
    Build number:
    R16NWA320FLXXS77CTFK

    I only want to root my device, so is there some other method?
    Is my assumption correct that if I only want to root the device, I do not need to use Odin/TWRP method, and I can achieve the same by installing the latest version of “Magisk Manager” according to this?:
    http://www.androidinfotech.com/magisk-versions-download/#Installation_Method

    Reply
    • Selva Ganesh says

      September 30, 2020 at 3:09 pm

      We updated TWRP with the latest version. You can try it now.

      Reply
      • Bela says

        October 2, 2020 at 2:16 am

        I downloaded the TWRP again from the link above.
        But I got the same error.
        Are you sure you updated the new TWRP file as it is binary identical with the one I downloaded before entering my first comment on Sep 30th:
        C:\Projects\Android\A320FL>FC /B “samsung_sm-a320fl_Oreo_TWRP_old.tar” “samsung_sm-a320fl_Oreo_TWRP.tar”
        Comparing files samsung_sm-a320fl_Oreo_TWRP_old.tar and SAMSUNG_SM-A320FL_OREO_TWRP.TAR
        FC: no differences encountered

        Reply
        • Selva Ganesh says

          October 2, 2020 at 2:46 pm

          Yes, we updated the mirror with a new recent file. You can try with the A320F TWRP file.

          Reply
          • Bela says

            October 3, 2020 at 2:13 pm

            Thanks for the support so far!
            However, as I have the A320FL and not the A320F, do I dare to use that TWRP file?
            From the file name of the A320F file, it seems to be version 3.1.1-1, and I found another 3.4.0-0 from the official twrp site.
            So, what is your suggestion? Should I first try the 3.4.0-0 and then the 3.1.1-1 if the first does not work?

          • Selva Ganesh says

            October 3, 2020 at 2:46 pm

            Both models have the same processor. So, It will work.

  11. Bela says

    October 4, 2020 at 3:42 am

    I tried it now, and it works, ok!
    Rooted an old Galaxy S6 and the same method (but other TWRP), and that device is also rooted now!

    Thanks a lot for the support!

    Reply
    • Selva Ganesh says

      October 4, 2020 at 3:21 pm

      We feel happy..:)

      Reply
  12. Martin E. says

    December 9, 2020 at 3:48 am

    Hi,
    I have A3(2017) SM-A320FL.
    The goal is to recover some deleted files.
    Therefore I want to root.
    USB debugging is on; USB configuration MTP (developer mode)
    BUT: the phone is just charging. I can’t connect with USB.
    No popup or something…just charging.
    So, is there a way to root via the SD card?

    Thanks for the support,
    hopefully, Martin

    Reply
    • Selva Ganesh says

      December 9, 2020 at 12:55 pm

      You have to Boot into download mode to flash TWRP.

      Reply
  13. rafael says

    February 13, 2021 at 3:13 am

    Hi,
    I’m not able to load the TWRP with Odin on my device. The log shows:
    recovery.img
    RQT_CLOSE !!
    Complete(Write) operation failed.
    All threads completed. (succeed 0 / failed 1)
    Do you have any idea where the error is coming from?

    Thanks a lot!
    Rafael

    Reply
    • Selva Ganesh says

      February 13, 2021 at 9:52 pm

      Can you mention your build number?

      Reply
      • rafael says

        February 14, 2021 at 6:00 pm

        The built number is:
        R16NW.A320FLXXS9CTK2

        Reply
        • Selva Ganesh says

          February 14, 2021 at 9:20 pm

          Did you flash the FL version or F?. You should flash the correct TWRP file.

          Reply
          • rafael says

            February 15, 2021 at 10:09 am

            I tried to flashed the FL version: samsung_sm-a320fl_Oreo_TWRP.tar

          • Selva Ganesh says

            February 15, 2021 at 7:54 pm

            Check with USB Debugging and OEM Unlock. Also, check with the PC Resource availability. Sometimes when you perform with low RAM availability, the process will fail, or the program will not respond.

Leave a Reply Cancel reply

Your email address will not be published. Required fields are marked *

This site uses Akismet to reduce spam. Learn how your comment data is processed.

Primary Sidebar

Join With Us

Recent Posts

  • How to get Free Samsung Galaxy A32 5G in T-Mobile with Any Mobile Trade-In?
  • Google Pixel 6 will use In-House Whitechapel Processor
  • Download Xiaomi Redmi Note 10 Pro/Max MIUI 12 Android 11 ROM
  • How to Solve Google I/O 2021 Virtual Event Date Reveal Puzzle?
  • Download Samsung Galaxy A70 SM-A7050/F/FN/GM/MN/U/W/YN Android 11 One UI 3.1 Stock Firmware

Today Tip

Samsung Galaxy A32 5G Home Screen 90Hz Check

How to get Free Samsung Galaxy A32 5G in T-Mobile with Any Mobile Trade-In?

After T-mobile acquire Sprint, It becomes one of the leading carriers in the US. Even before Sprint … [Read More...] about How to get Free Samsung Galaxy A32 5G in T-Mobile with Any Mobile Trade-In?

Advertisement

Copyright © 2021 AndroidInfotech.com, All Rights Reserved, Android is a trademark of Google Inc. All contents on this blog are copyright protected and should not be reproduced without permission.

  • Subscribe
  • Sitemap
  • About Us
  • Contact Us
  • Privacy Policy
  • Disclaimer
  • Our Image License
  • Hosted on Google Cloud
  • Ad Partner Ezoic