Even if Samsung Galaxy J7 2016 Model didn’t get hit sales like J7 2015 Model, Lot of users bought this phone. In those days, We expect at least 3 GB RAM in this variant. But after one year Samsung just increased 0.5 GB RAM. Yes, J7 2015 model has 1.5 GB RAM, and this 2016 model has 2 GB RAM. But Exynos 7870 Octa-Core processor, It performs slightly well with it’s an older model. But in more extended usage, a lot of users faced lag issues. Some of the users still using this mobile. It is worth with it’s AMOLED Display. If you want your mobile back, follow below steps carefully.
Why should you Root Samsung Galaxy J7 2016?
With just 2 GB RAM you will feel a lot of lag and prolonged performance in long term usage. Your warranty also expired. So we can take the risk to optimize your mobile. After root and Uninstalled Bloatware and hibernate some apps, you can expect 20-30% performance improvement. If you install custom Lite weight ROM, you can expect 50-70% improvement in performance.
How to Root Samsung Galaxy J7 2016? (SM-J710F / SM-J710FQ/ SM-J710GN / SM-J710K)
Samsung Galaxy J7 2016 International variants come with a flexible bootloader. This means that the smartphone can be easily rooted. Also, the device can accept to install TWRP recovery or any other custom recovery file/app alike.
TWRP recovery is a custom recovery file which must be installed on Samsung Galaxy devices because you can root them successfully. In this article, we explained the easiest method to follow and install TWRP recovery on Samsung Galaxy J7 2016. However, the tool required for rooting this device is the Magisk App.
With the help of TWRP Recovery, you can quickly flash the latest version of Magisk into your J7 2016 to gain root access. Before sharing the tutorial, you may want to know that, with the TWRP recovery present on your device, you can easily install any custom ROM or firmware. Does it seem complicated? Relax, everything will be explained succinctly in bullets.
Things to check out for;
Check your device model number.
- Select TWRP Based on the mobile model number.
Make sure your device battery is charged above 50%
Backup your current files and data, just in case (save them on external storage).
Pre-Requirement Steps
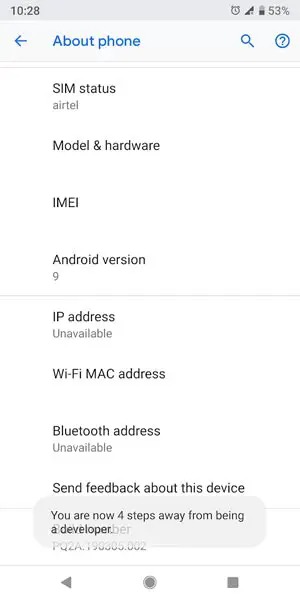
Enable USB Debugging Mode and OEM Unlock in your mobile. To do this; go to settings >>> about >>> Tap on the “Build Number” 7-10 times consistently to enable “Developer Options,” then go to the “Developer Options” and enable USB Debugging Mode and OEM Unlock. There is no complicated process in the Samsung Galaxy J7 2016.
Download and install the Samsung USB driver to your computer system.
Also, download the ODIN software. Select above Oreo version in the ODIN list. Install ODIN in your PC.
- Download Magisk.Zip (Download Latest version) and RMM State Bypass, Copy it to Your Phone Memory. We Need to flash RMM State to avoid OEM Lock automatically in future after the Root process.
Download and save the TWRP File. Select Correct TWRP file from Below. This TWRPs can support Up to Oreo.
- SM-J710F
Flash TWRP using ODIN
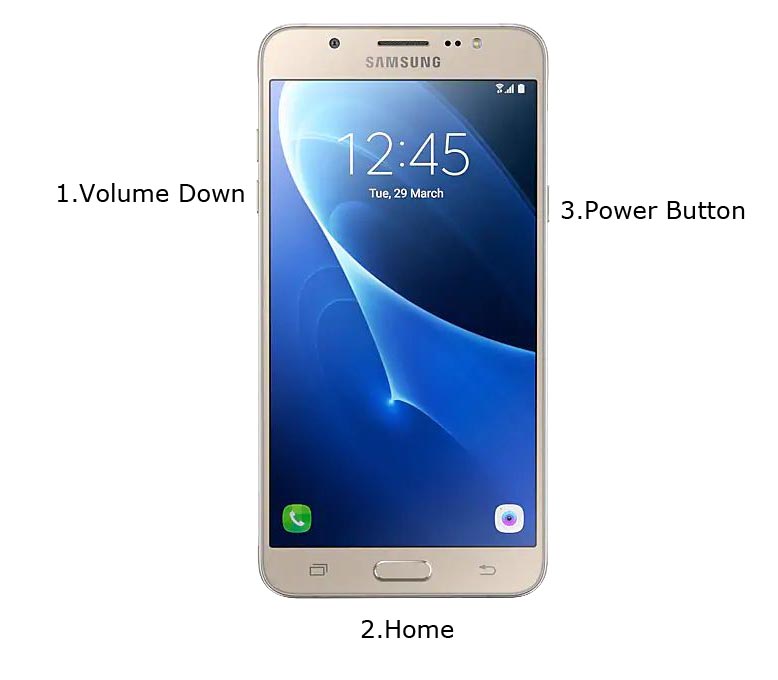
- Connect your USB Cable with PC. Switch off your device. Then, enter into Download mode. To do this; press and hold down the Volume Down + Home + Power buttons at the same time and connect your micro USB Cable.
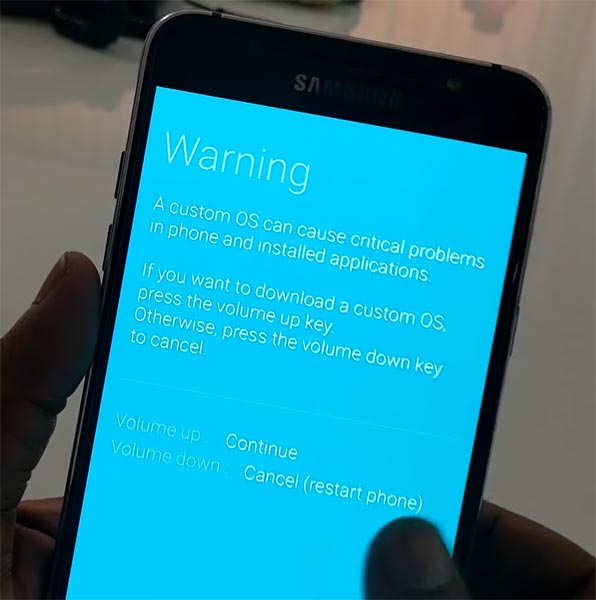
Press the Volume Up button to continue when you see the warning message.
Now, connect the J7 2016 mobile to the computer via USB cable.
Launch the Odin app on your computer. If the device is detected by this app (Odin), it will show you a message that reads – added!!!
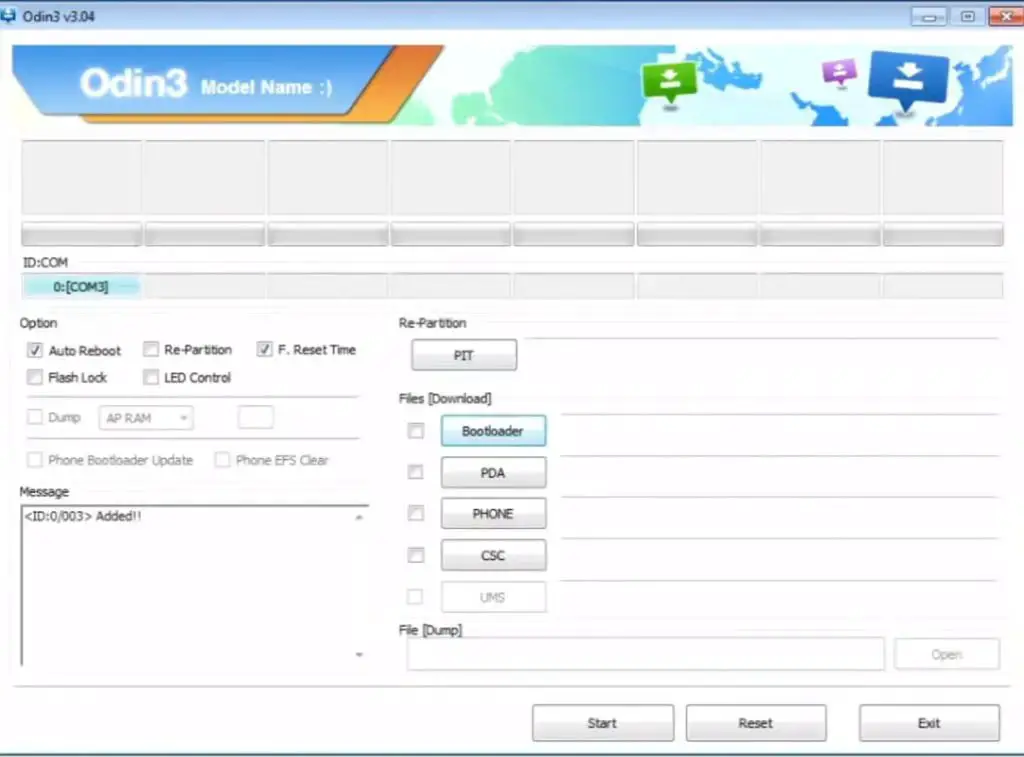
However, if the device is not correctly connected to the PC, you won’t see this message. So, you have to check the USB cable if it is good and reconnect the device.
After connecting the Samsung device, click on the PDA/PA button to browse/search and get the TWRP from where you saved it on your PC. Also, navigate to “options” and un-tick the Auto Reboot.
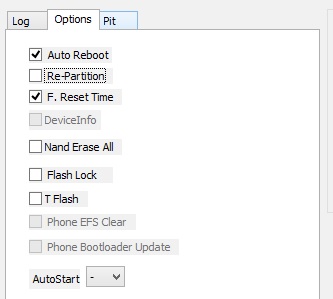
Click on “Start”
Once the file is loaded into the device, reboot your device.
Kudos, you have just Installed the TWRP/CF-Auto-Root on your Samsung Galaxy J7 2016. If you installed TWRP, Don’t turn on your mobile. Immediately, move to Magisk Installation steps.
Install Magisk, RMM State in your Samsung J7 2016 using TWRP
- Boot it Into recovery mode->Volume Up + Power Button.
- Now it Will Boot into TWRP Recovery Mode.
- Select Wipe->Advance Wipe->Select Cache Data.
- Return to Home of TWRP select Install.
- Select Magisk.Zip. After Installation again Navigate to Home select Install. Select RMM State Bypass.
- After the Installation Reboot Your Mobile.
- You can also install Magisk.apk in your Mobile Applications. RMM State is used to avoid OEM Lock after rooting.
What More?
You should not Boot into Normal OS Booting, after TWRP. After TWRP Flash, Immediately Boot into Recovery or Else you will get Warning message FRP Lock. If you accidentally urged and boot frequently, Don’t panic, flash official stock firmware to get back into stock OS.
Selva Kumar is an Android Devices Enthusiast, Who Can Talk and Write About Anything If You Give a Hint About the respective devices. He is a Computer Science Graduate, Making His Career towards this Technology. He is always eager to try new Android devices — not only Software level but Hardware-level Also. Beyond this, He is a Good Swimmer, Guitarist.
Please upload TWRP for SM-J710FN oreo verison
Can you tell your Mobile Build Number?
Settings-> About -> Software Version.
Funciona en el J710MN?
M1AJQ.J10MNUBU4CRK2
No No hemos añadido ese TWRP. Me puse en contacto con el equipo de Dev con respecto a esto. Podemos actualizar pronto.
सेमसंग गैलैक्सी स्मार्ट J7(6)10 FNDD2016का अपडेट डावनलोड दे
जे 7 2016 ईडिशन के लिए कोई पाई या एंड्रॉइड नहीं है।
Hello, for are this version Samsung j710gn works for mali??
Yes, It will work up to the Oreo version.
did not work on sm-j710f android 8.1
I flashed twrp 3.2 then the magisk and the rmm bpass. once done tried to boot the system but got a message saying “The integrity verification has failed”.
Had to flash rom again.
Did you flash Official TWRP 3.2 or Our modified TWRP? If you flash the official TWRP additional to the RMM Pass, you should flash no-verity-opt-encrypt also. Before installing anything, you should wipe cache data in TWRP.
I`m using official TWRP 3.2.1 When I flashed your modified TWRP, nothing happened and the official recovery of my phone boots up! So I used the official TWRP.
I wiped cache and installed magisk, rmm and no-verity-opt-encrypt. and my phone booted up. but just realized it`s not rooted.
Funciona en SM-C710F/DS ?
No. Your model is C7 2017.
Why not work on my sm-j710k?
Did you get the “Success” message in ODIN?
bro. my phone just immediatley go to android recovery
the twrp didnt for sm j710gn didnt work..after i flash and reboot it just start normally..i enter the recovery mode and didnt seem like the twrp is installed since it goes to normal recovery not twrp one.
You should Reboot to Recovery in the first Boot. ODIN Flash will give you Temporary TWRP; You should flash Magisk to manage and Stay with Root access. If you Boot to the normal OS, you may lose TWRP. Restart the process from the first step.
help me please…..
i am not able to open recovery after flashing the recovery file successfully from odin with pass message i tried to do it as fast as i and when i pressed volume up + power + home the phone vibrates it feels like it will gonna open twrp but it open no command screen and after showing that screen for few seconds it opens stock recovery and yeah i have tried it more than 10 times but everytime that’s how it goes so can anyone please help me
As we mentioned, you should boot into First boot into TWRP. Un-tick the Auto reboot in ODIN and flash TWRP again.
Hi, so when it does wipe cache partition the partition user data, it’s erased? I´m trying to recover data, so it’s important to me not to wipe the user partition. Is it still not working for the SM-J710MN with android 7.0 as you said two months ago? Thanks
Cache partition does not delete your personal data. It will help to avoid some bootloop issus after Magisk flash. It will work well with all above model numbers. Can you specify your Build nuber? You can fins this in Software version.
I followed your guide step by step, but after installing the TWRP using Odin and booting into recovery mode, it goes to the stock recovery mode and not the TWRP
Hi. The TWRP is not working on my device. I downloaded the TWRP file that you give for my model (And it is installed because in Odin everything is ok, it says PASS). I un-tick the auto reset option, so I turn off my device after the Odin twrp installation and then turn the device on within the recovery mode (without booting the device before, this is the first boot), and the TWRP is not showing up! It just launches the Regular android recovery. And I do not know what else can I do. As I said, Odin is ok; device is ok because I did not restart it, and I repeated this several times. Please, help me.
I was thinking if maybe there would be an option for installing Magisk without the TWRP would work. I don’t know if it would work with another custom recovery.
I wonder what the problem with your device is. But, If you consider Magisk. Yes, you can get root access using Magisk without TWRP. Download your firmware which should be same as your recent mobile version. Install Magisk app. Patch the Downloaded firmware files. Flash the patched firmware using ODIN.
Hope the following post can help you. Instead of s10 follow Instructions as per your device.
https://www.androidinfotech.com/root-samsung-galaxy-s10-plus-exynos-sm-g975f-pie/
Dear Selva,
Thanks for writing this tutorial.
I tried to root my Samsung J710FN using Magisk without TWRP, following those steps on https://www.androidinfotech.com/root-samsung-galaxy-s10-plus-exynos-sm-g975f-pie/ but patching the Firmware J710FXXU6CSE1_J710FDBT6CSE1_J710FXXU6CSE1_HOME.tar.md5 for my device instead. Then I selected AP in Odin and added the magisk_patched.rar file, clicked on Start and it got stuck on sboot.bin.lz4
I have no idea why this happened. Would you please please help me?
You should Choose SM-J710FN Firmware. Don’t Patch the International “F” variant. Patch the firmware and flash it again. Your current Build Number and Patched Build number Should be same.
Thanks for replying soon. I deleted my Google Account, downloaded the firmware from another source, flashed it with Odin v3.13.3 and now I have a rooted debloated smartphone.
Million Thanks
Hi, bro how I can root my phone model SM-J710FQ android 8.1.0…I want to take root because I can’t open youtube Instagram. Whatsapp.
As per your problems, you don’t need root. Flash the firmware again. Or Repair using Samsung SmartSwitch.
I can flash magsik 18.1 insert of super su right ?
Yes. Right.
Hello, does a samsung j710GN with android version 8.1.0 works with this?
Yes, It will work up to Oreo version 8.1.0.
Bro which TWRP file would work for SM-J710FN Model..? Please update.
We updated the article with the official TWRP file. Now you can use the TWRP file for SM-J710FN Model number.
The procedure does not work with my J7 2016. I have tried many times, but the following wording appears:
“Verification failed
Unable to restart the device. The integrity check failed. You must restore the device’s factory default settings. This operation will result in the deletion of all data. ”
I had to reinstall the original firmware.
Is it possible to have the procedure for my phone?
Model: SM-J710FN
Android: 8.1.0
Build Number: M1AJQJ710FXXU6CSE1
I await your kind reply, thanks
Enable USB Debugging. Try with Latest ODIN version.
Thanks for the reply. I’ve already enabled USB Debugging and have used the latest version of Odin3_v3.13.1 or do I have to use ODIN-modified.zip or Odinv3.12 PrinceComsy.zip?
You should Select Latest ODIN. Don’t use modified ODIN. Your Model number is “FN.” Don’t try other firmware like “F” or “FQ.” This time Extract the Firmware. You will get Four Files. Launch Odin and Select all files separately, According to their names. After Selecting four files, Start the process.
Hi, can I use it without enabling USB? My Phone is blocked.
No. You should enable USB Debugging. Without allow this, We can’t flash Root files.
There is no PDA on Odin, so I chose AP. After I press start:
SetupConnection..
And that’s all. Can’t continue the process.
Did you get the “Added” message in ODIN? Check ODIN can recognize your device.
my odin pc said it already finish. but my phone still stuck at odin mode. what to do
Press Volume Down+ Power to exit download mode and Press Volume Up+ Power to Boot into Recovery mode.
twrp for j710gn didn’t work. I follow all the steps. Still not work.
Can you mention your mobile Build Number? Did you get a “PASS” message in ODIN?
I get that pass in odin.. but when I try to boot into twrp it says no command
my build is
M1AJQ.J710GNDXU4CRJ9
Your mobile is on October Security Patch. Press Volume Up+ Power Button, If the mobile doesn’t go to TWRP, Repeat the process and First boot into TWRP and then flash magisk. You should boot your mobile to TWRP after the flash. If you boot into OS, You will lose TWRP.
if I lose it.. which step I have to repeat?
You should start from the beginning. Because If we lost TWRP, We can’t do the further process.
Sir, it’s still not working.. do you have a link or file to official j710gn twrp?
Currently, there is no official version available. We will update once possible. If you mention your current build number, I can help you further.
Boa noite, após fazer tudo o que indica e após reiniciar recebo a msg de falha de verificação e a opção de repor, que ao fazer volta ao twrp fazendo running open recoveryscript, com linhas a vermelho pelo meio e volta ao mesmo, arranca com o mesmo erro de falha de verificação e não sai do mesmo, sempre em circulo
Qual é o número do seu modelo e a versão atual do Mobile? Você pode atualizar o firmware padrão usando ODIN para reparar o firmware do telefone. Então, se você deseja fazer o root, deve piscar o TWRP correto com base no número do modelo.
Boas,
sm-j710fn e tinha 8.1
voltei a fazer tudo de novo e a msg de erro é sempre a mesma:
“falha ao montar \`/data\`(invalid argument)”
faço reiniciar, ele arranca com o logo da samsung , depois muda para o logo da rom e nunca mais sai dai
Existem alguns problemas de conectividade. Tente com o ODIN mais recente e ative a depuração USB.
boas,
encontrei uma imagem de origem que instalei com o odin e já funciona tudo mas sem root
quando sigo os teus passos volta tudo ao mesmo, ao arrancar dá mensagem de falha de verificação
Como eu disse anteriormente, você deve atualizar o arquivo de criptografia antes do Magisk.
My device got stuck at twrp boot, and I don’t find the super su file I saved what I can do??
You should flash the Magisk. SuperSu is old and may make some issues when flash.
Hi, my baseband version J710FXXU6CSK2 pls help how to root my android version 8.1.0 I tried two times but failed. I paid at the services center. No help.
This process will work with the Oreo version. Don’t pay for this kind of root process until you have decent relations with these service centers. If they failed in the process, they would not make a refund to you. Read the article two times; you will get the idea of how you can do it.
Samsung galaxy J7 2016 SM-J710FQ ANDROID 8.1.0 için TWRP istiyorum ilgilenirseniz sevinirim teşekkürler
You can use the FQ TWRP. It can Root both Nougat and Oreo version.
My device (Samsung Galaxy j7 j710gn) prompts the ”custom binary blocked by FRP lock,” can you help me with this I don’t know where or how to flash the official stock framework.
You can flash J710GNDXU4CRJ8 XTC — Philippines firmware.
Hello Mr selva
My device model is Sm-J710FN. After I tried to install root, its saying verification failed. Please help.
Verification failed.
Unable to restart your device. The integrity verification has failed. You need to reset your device to factory default.
Did you flash the correct file?
No Problem. Flash the stock firmware using ODIN.
yes sir
Thanks for your help I rooted my mobile.
We feel great for you..:)
Model: SM-J710FN
Android: 7
Is Will rooting this device ask for factory reset? I don’t want to lose my phone data. Is the rooting possible without losing any data?
And how much time the process takes?
Please help.
It will not wipe your data. But it is better to take complete backup. The whole process may take from 15 minutes to 30 minutes depending on your work.
Hello sir
Can you please tell me how to install magisk because I have already rooted my sm-j710fn with supersu.
Thank you
Install Magisk Manager.