• Skip to primary navigation
  • Skip to main content
  • Skip to primary sidebar
Android Infotech

Android Infotech

Android Tips, News, Guide, Tutorials

  • Applications
  • Knowledge
  • I’m Bored
  • Opinion
  • Tutorial
  • Root
  • Firmware
  • Daily Deals
Home » Root » Root Samsung Galaxy J7 SM-J700F Marshmallow, Nougat using TWRP and CF-Auto-Root

Root Samsung Galaxy J7 SM-J700F Marshmallow, Nougat using TWRP and CF-Auto-Root

Last updated on March 27, 2019 By Selva Ganesh 14 Comments

Do you want to have root access to your Galaxy J7? That’s a good thing you want to do. Samsung Galaxy J7 was launched in June 2015. Primarily, it comes with Android Lollipop OS version (5.1.1). But, you can update, the OS version to Android Marshmallow 6.0.1. Upgrading the OS version can be automatic via OTA or done manually using the Odin flash tool. Ah, Nougat? Yes, Sprint and T-Mobile devices already running with Nougat. But International versions only get security updates.Samsung Galaxy J7 with Black Background
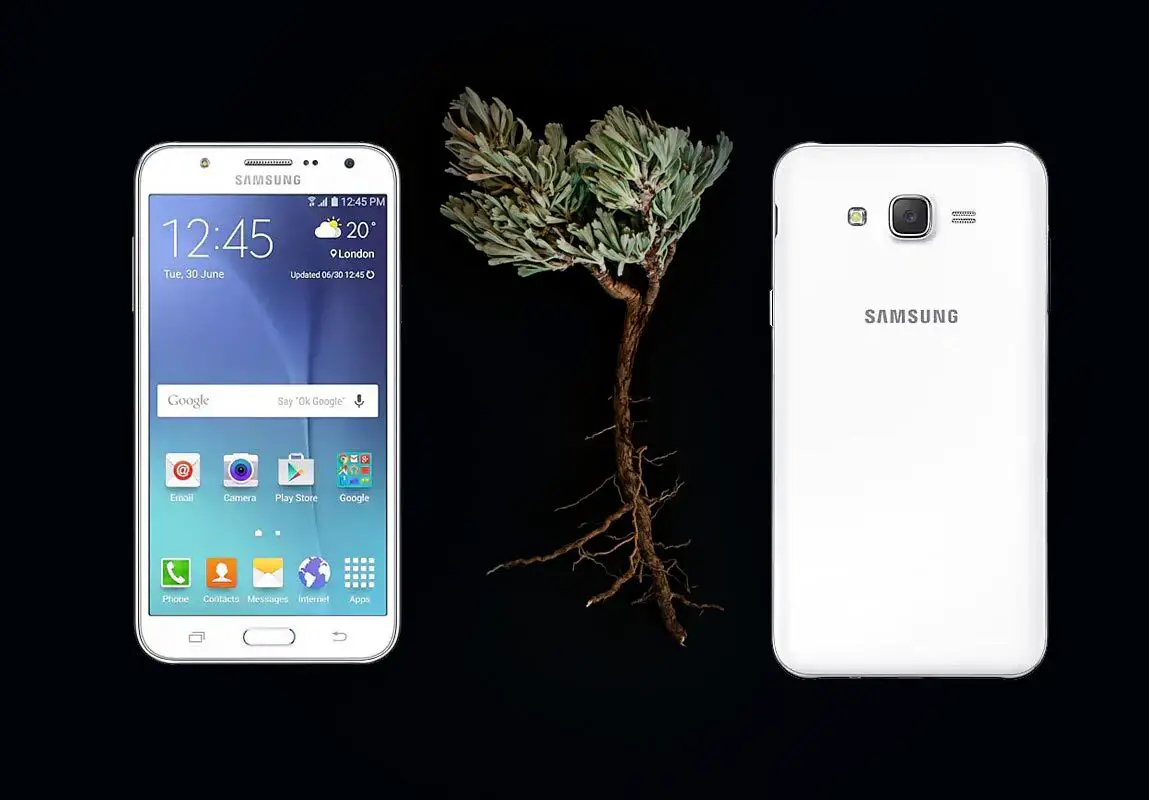
Table of Contents

  • Why you should Root Samsung Galaxy J7 SM-J700
  • How to root Samsung Galaxy J7?
    • Things to check out for;
    • Pre-Requirement Steps
    • For International Variants (SM-J700F, SM-J700M, SM-J700H, SM-J700K)
    • US Variants (Snapdragon Processor- SM-J700P, SM-J700T)
    • Flash TWRP/CF-Auto-Root using ODIN
    • Install SuperSu in your Samsung J7 using TWRP
    • Install Magisk in your Samsung J7
  • What More?

Why you should Root Samsung Galaxy J7 SM-J700

Until you root your J7 device, there are quite a lot of actions you can never do on the smartphone. Also, you’re limited to how you can customize the device. Albeit, once your Galaxy J7 is rooted, then, you have unlimited access to do whatever you wish to do with the device. Most interestingly, you’ll be able to delete/uninstall all bloatware apps installed by the OEM and free up your internal memory space. There are many advantages you enjoy when you root your Android device.

How to root Samsung Galaxy J7?

Luckily, your Samsung Galaxy J7 comes with a flexible bootloader. This means that the smartphone (Galaxy J7) can be easily rooted. Also, the device can accept to install TWRP recovery or any other custom recovery file/app alike.

TWRP recovery is a custom recovery file which must be installed on Samsung Galaxy devices because you can root them successfully. In this article, we explained the easiest method to follow and install TWRP recovery on Galaxy J7. However, the tool required for rooting this device is the SuperSu Beta App.

With the help of TWRP Recovery, you can quickly flash the latest version of SuperSu into your J7 to gain root access. Before sharing the tutorial, you may want to know that, with the TWRP recovery present on your device, you can easily install any custom ROM or firmware. Does it seem complicated? Relax, everything will be explained succinctly in bullets.

For Snapdragon versions it is better to use CF-Auto-Root first and then you can flash TWRP Later.

Things to check out for;

  • Check your device model number.

  • Select TWRP or CF-Auto-Root Based on the mobile model number.
  • Make sure your device battery is charged above 50%

  • Backup your current files and data, just in case (save them on external storage).

Pre-Requirement Steps
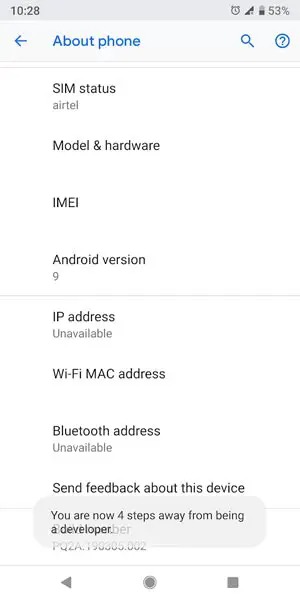
Enabling developer option

  • Enable USB Debugging Mode and OEM Unlock in your mobile. To do this; go to settings >>> about >>> Tap on the “Build Number” 7-10 times consistently to enable “Developer Options,” then go to the “Developer Options” and enable USB Debugging Mode and OEM Unlock. There is no complicated process in the J7.

  • Download and install the Samsung USB driver to your computer system.

  • Also, download the ODIN software. Select above Oreo version in the ODIN list. Install ODIN in your PC.

  • Download SuperSu.Zip and Copy it to Your Phone Memory.

For International Variants (SM-J700F, SM-J700M, SM-J700H, SM-J700K)

  • Download and save the TWRP File If you use Model Numbers- SM-J700F, SM-J700M, SM-J700H, SM-J700K. We should use only the .tar file. We can’t flash the .img file using ODIN.

US Variants (Snapdragon Processor- SM-J700P, SM-J700T)

  • Download and save the CF-Auto-Root, If you use Model Numbers- SM-J700P (Sprint USA), SM-J700T (T-Mobile). We should use only the .tar file. We can’t flash the .img file using ODIN.

Flash TWRP/CF-Auto-Root using ODIN
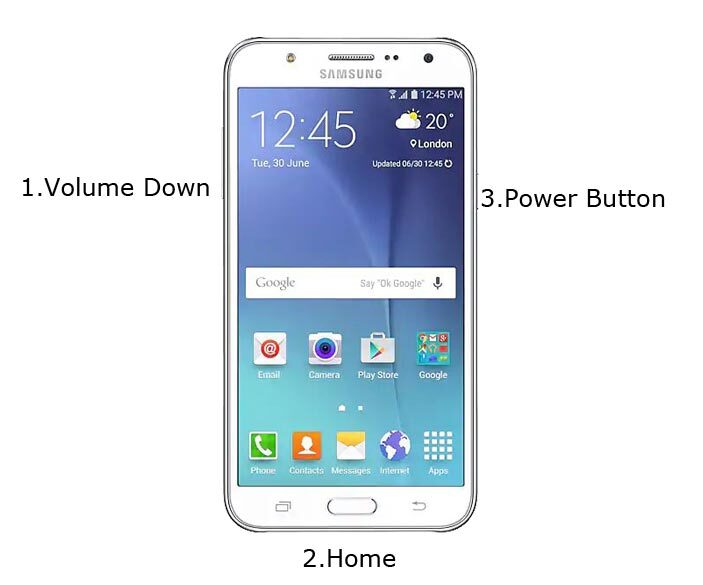
Samsung Galaxy J7 Download Mode


  • Restart the device. Then, enter into Download mode. To do this; press and hold down the Volume Down + Home+ Volume Up buttons at the same time for some time.
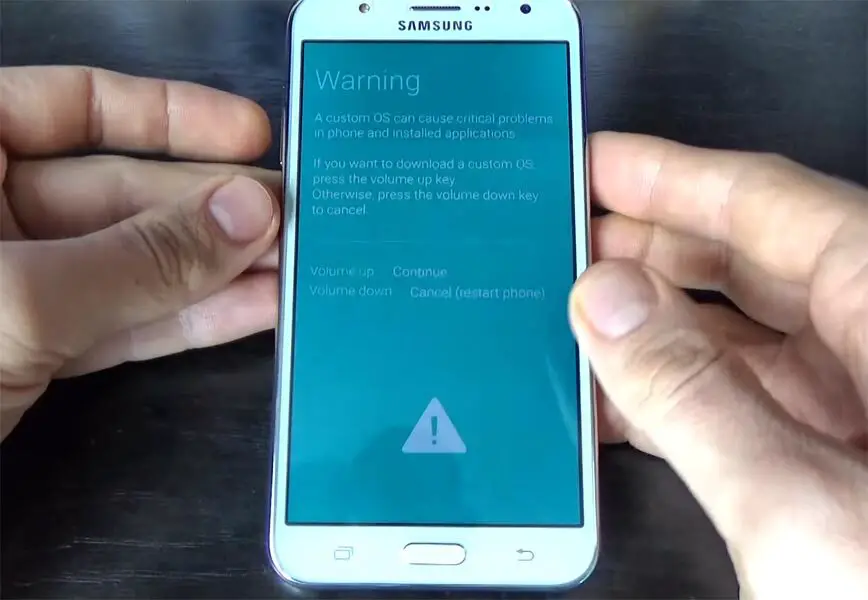
Samsung Galaxy J7 Download Mode Warning screen

  • Press the Volume Up button to continue when you see the warning message.

  • Now, connect the J7 mobile to the computer via USB cable.

  • Launch the Odin app on your computer. If the device is detected by this app (Odin), it will show you a message that reads – added!!!
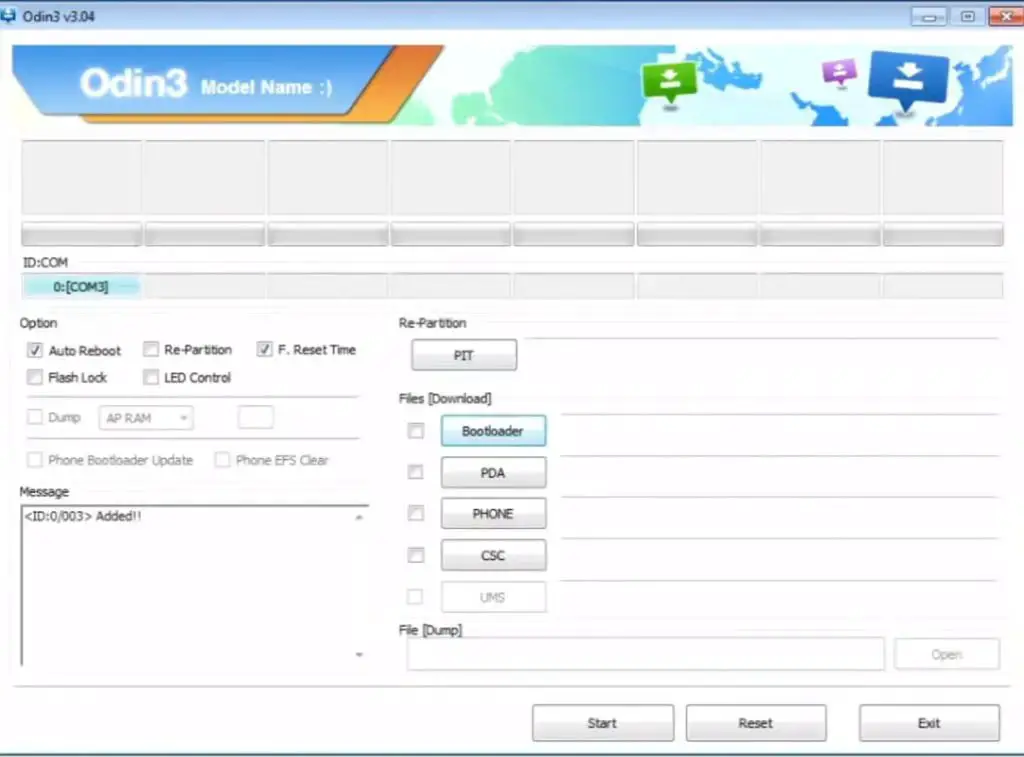
ODIN Added Message


However, if the device is not correctly connected to the PC, you won’t see this message. So, you have to check the USB cable if it is good and reconnect the device.

  • After connecting the Samsung device, click on the PDA/PA button to browse/search and get the TWRP/CF-Auto-Root from where you saved it on your PC. Also, navigate to “options” and un-tick the Auto-Reboot.
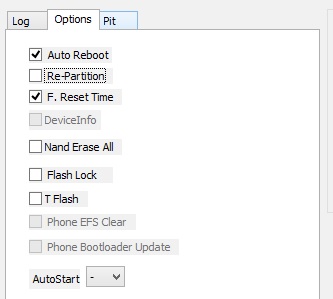
Odin Auto Reboot

  • Click on “Start”

  • Once the file is loaded into the device, reboot your device.

  • Kudos, you have just Installed the TWRP/CF-Auto-Root on your Samsung Galaxy J7. If you installed TWRP, Don’t turn on your mobile. Immediately, move to SuperSu Installation steps.

Install SuperSu in your Samsung J7 using TWRP

  • Follow this step only if you installed TWRP. If you installed CF-Auto-Root, you already have SuperSu on your mobile. So, you can skip this step.
  • Boot it Into recovery mode->Volume Up+ Home +Power Button.
  • Now it Will Boot into TWRP Recovery Mode.
  • Select Wipe->Advance Wipe->Select Cache Data.
  • Return to Home of TWRP select Install.
  • Select SuperSu.Zip.
  • After the Installation Reboot Your Mobile.
  • Now You Can Find the SuperSu in your Mobile Applications.

Install Magisk in your Samsung J7

However, the SuperSU app will appear among your installed app so you can manage Root permissions. If you wish, you can install Magisk Manager APK to manage Superuser Permissions. Just download and install Magisk manager app as you do for Normal APK files.

What More?

That’s all you Rooted your Samsung Galaxy J7 2015 Model. If you face any issue or you confused with any steps, comment below, We will try our best to help you.

Selva Ganesh

Selva Ganesh is a Chief Editor of this Blog. He is a Computer Engineer, An experienced Android Developer, Professional Blogger & addicted Web Developer. He runs Android Infotech which offers Problem Solving Articles around the globe.

Related Posts:

  • Install Samsung Galaxy J7 2015 SM-J700F/H/K/M Lineage OS 17.1…
  • Root Moto G3 2015 Marshmallow using TWRP and Install Magisk
  • Download Samsung Galaxy Tab 4 10.1 2015 SM-T530/1/2/5/6/7…
  • Download Samsung Galaxy A3 2015 SM-A300F/G/Y Lollipop,…
  • Root Samsung Galaxy A7 2015 SM-A700F/FD/H/K Marshmallow 6.0.1…
  • Root Samsung Galaxy Tab A 8.0 S Pen 2015 SM-P350/P355…
Share This Post:

Tagged With: Samsung

Reader Interactions

Comments

  1. Michael says

    August 21, 2019 at 11:19 am

    I need help. Attempted root on Galaxy J7 and SuperSu is missing, and Root Checker says it failed. The phone appears to be functioning normally but not sure if I damaged it at all. Please email me and let me know if you guys can help me.

    Reply
    • Selva Ganesh says

      August 21, 2019 at 1:00 pm

      Did you get the “PASS” message in ODIN? If you didn’t, enable USDB Debugging and Repeat the Steps.

      Reply
  2. Jose Luis says

    September 7, 2019 at 1:11 am

    First of all thanks for your help, 2nd, pardon my English, My phone is a J700T from T-Mobile with android 7.1.1, I downloaded the files for it from the links you gave us and I received the PASS! Message but no matter what I do, I can’t get the SuperSu installed. I’m trying to get my phone rooted to try to modify the 3G bands to 900Mhz that is the frequency that works in Cuba, Phones in Cuba are expensive, and I’m not on a position to buy a new one, so please could you help me. If there is any way to modify the 3G bands without rooting the phone, it will work for me as well.

    Reply
    • Selva Ganesh says

      September 7, 2019 at 1:00 pm

      If you want to change Mobile Network Bandwidth, You can try this Dial *#*#4636#*#* and Go to LTE/TD-SCDMA/UMTS and change the network to WCDMA only. Mobiles are expensive in your area. Rooting your mobile may be a risk. So, I advise you to take a complete backup and try with J700T. Your mobile is the T-Mobile Variant. Don’t flash other Root files. It will brick your mobile — no problem with the comment posting. We are always here to help you. Contact me again IF you face any issue. As I said already Before Root Try the settings alteration.

      Reply
      • Jose Luis says

        September 7, 2019 at 11:51 pm

        Thanks for the answer, but the code to dial isn’t work on my phone, I’m convinced that I must take the risk and root my phone, I’m still looking for information because Ixve tried different ways and no results, any information you can give my mail is joseluis.barban@nauta.cu. Thanks

        Reply
  3. Jose Luis says

    September 7, 2019 at 2:02 am

    Sorry for posting the same twice is that I was checking if it was correctly posted and it didn’t appear, I’m connected by 2G right now, so the connection is really slow. I am sorry.

    Reply
  4. jaswinder says

    September 22, 2019 at 10:01 pm

    hi
    I am trying to root the j7….in Odin I got PASS msg…….after that nothing happens. root checker msg is …root is not successful

    Reply
    • Selva Ganesh says

      September 23, 2019 at 6:35 am

      You should flash SuperSu.zip in the first boot. Or Else you will lose root access. Un-tick auto reboot in ODIN. Flash TWRP again.

      Reply
  5. VISHNU PRASAD says

    October 14, 2019 at 9:39 am

    Samsung Galaxy j7 f software 6.0.1

    Reply
    • Selva Ganesh says

      October 14, 2019 at 11:46 am

      Yes, Your mobile is an International unlocked variant. The root method will work.

      Reply
  6. Elie Saikaly says

    July 5, 2020 at 9:40 pm

    I’ve tried multiple times, and I’m always stuck on downloading… do not turn off target. Any help? using the j700h

    Reply
    • Selva Ganesh says

      July 6, 2020 at 3:23 pm

      Did ODIN detect your device? Mention your build number.

      Reply
      • BLASTROIES says

        February 21, 2021 at 9:48 pm

        I AM TOO STUCK ON THE SME THING MY MODLE IS SM-J700F
        ODIN DETECTED MY DEVICE, AND ALL SHOWED GREEN PASS 00:03
        WHAT I HAVE TO DO???

        Reply
        • Selva Ganesh says

          February 23, 2021 at 2:56 pm

          Press Volume Down+Power to exit download mode.

          Reply

Leave a Reply Cancel reply

Your email address will not be published. Required fields are marked *

This site uses Akismet to reduce spam. Learn how your comment data is processed.

Primary Sidebar

Join With Us

Recent Posts

  • How to get Free Samsung Galaxy A32 5G in T-Mobile with Any Mobile Trade-In?
  • Google Pixel 6 will use In-House Whitechapel Processor
  • Download Xiaomi Redmi Note 10 Pro/Max MIUI 12 Android 11 ROM
  • How to Solve Google I/O 2021 Virtual Event Date Reveal Puzzle?
  • Download Samsung Galaxy A70 SM-A7050/F/FN/GM/MN/U/W/YN Android 11 One UI 3.1 Stock Firmware

Today Tip

Samsung Galaxy A32 5G Home Screen 90Hz Check

How to get Free Samsung Galaxy A32 5G in T-Mobile with Any Mobile Trade-In?

After T-mobile acquire Sprint, It becomes one of the leading carriers in the US. Even before Sprint … [Read More...] about How to get Free Samsung Galaxy A32 5G in T-Mobile with Any Mobile Trade-In?

Advertisement

Copyright © 2021 AndroidInfotech.com, All Rights Reserved, Android is a trademark of Google Inc. All contents on this blog are copyright protected and should not be reproduced without permission.

  • Subscribe
  • Sitemap
  • About Us
  • Contact Us
  • Privacy Policy
  • Disclaimer
  • Our Image License
  • Hosted on Google Cloud
  • Ad Partner Ezoic