• Skip to primary navigation
  • Skip to main content
  • Skip to primary sidebar
Android Infotech

Android Infotech

Android Tips, News, Guide, Tutorials

  • Applications
  • Knowledge
  • I’m Bored
  • Opinion
  • Tutorial
  • Root
  • Firmware
  • Daily Deals
Home » Root » Root Samsung Galaxy J5 Prime SM-G570F/M/Y Nougat, Oreo 8.0 using TWRP

Root Samsung Galaxy J5 Prime SM-G570F/M/Y Nougat, Oreo 8.0 using TWRP

Last updated on April 9, 2019 By Selva Ganesh 60 Comments

Samsung J5 prime released with J7 prime, where J7 prime has two variants 2/3 GB RAM. But J5 Prime only has 2 GB RAM with less performing Processor. Yes, Quad Core processor. As you already know the struggle with 2 GB RAM and Quad-core processor. If you have Octa core, you can survive with regular daily essential apps. But with Quad core, you can’t use the mobile even for essential apps after extended usage. But After Root can I use Lag Free?, It depends. If you use Lite weight Custom ROMs, you can see a Massive improvement in performance. If you hibernate and remove some bloatware, you can expect only 20-40% performance Improvement.Samsung J5 Prime with Thunder Background

Table of Contents

  • Why should you Root Samsung Galaxy J5 Prime?
  • How to root Samsung Galaxy J5 Prime? (SM-G570F / SM-G570M / SM-G570Y)
    • Things to check out for;
    • Pre-Requirement Steps
    • Flash TWRP using ODIN
    • Install Magisk in your Samsung Galaxy J5 Prime using TWRP
  • What More?

Why should you Root Samsung Galaxy J5 Prime?

This model comes with only 2 GB RAM. If you use daily, you know. It is not enough Because of bloatware. Your device may get security patch updates, but no Major updates. You can feel the difference in performance issues day by day. There are plenty of Custom ROMs available that are work well with Samsung J5 Prime. I advise you to Root your device. Follow below steps carefully.

How to root Samsung Galaxy J5 Prime? (SM-G570F / SM-G570M / SM-G570Y)

Samsung Galaxy J5 Prime comes with a flexible bootloader. This means that the smartphone (J5 Prime) can be easily rooted. Also, the device can accept to install TWRP recovery or any other custom recovery file/app alike.

TWRP recovery is a custom recovery file which must be installed on Samsung Galaxy devices because you can root them successfully. In this article, we explained the easiest method to follow and install TWRP recovery on Galaxy J5 Prime. However, the tool required for rooting this device is the Magisk App.

With the help of TWRP Recovery, you can quickly flash the latest version of Magisk into your J5 Prime to gain root access. Before sharing the tutorial, you may want to know that, with the TWRP recovery present on your device, you can easily install any custom ROM or firmware. Does it seem complicated? Relax, everything will be explained succinctly in bullets.

Things to check out for;

  • Check your device model number.

  • Select TWRP Based on the mobile model number.
  • Make sure your device battery is charged above 50%

  • Backup your current files and data, just in case (save them on external storage).

Pre-Requirement Steps
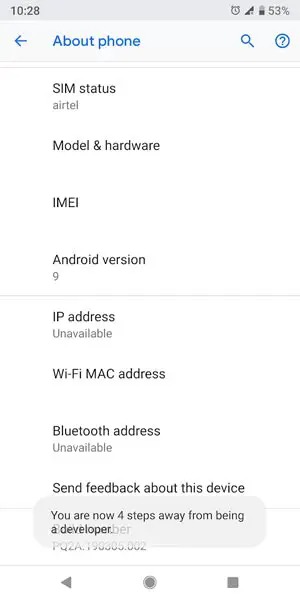
Enabling developer option

  • Enable USB Debugging Mode and OEM Unlock in your mobile. To do this; go to settings >>> about >>> Tap on the “Build Number” 7-10 times consistently to enable “Developer Options,” then go to the “Developer Options” and enable USB Debugging Mode and OEM Unlock. There is no complicated process in the Samsung Galaxy J5 Prime.

  • Download and install the Samsung USB driver to your computer system.

  • Also, download the ODIN software. Select above Oreo version in the ODIN list. Install ODIN in your PC.

  • Download Magisk.Zip (Latest version) and Copy it to Your Phone SD card Memory.
  • Download and save the TWRP File. Please select correct model number TWRP file.

  • SM-G570F
  • SM-G570M
  • SM-G570Y

Flash TWRP using ODIN

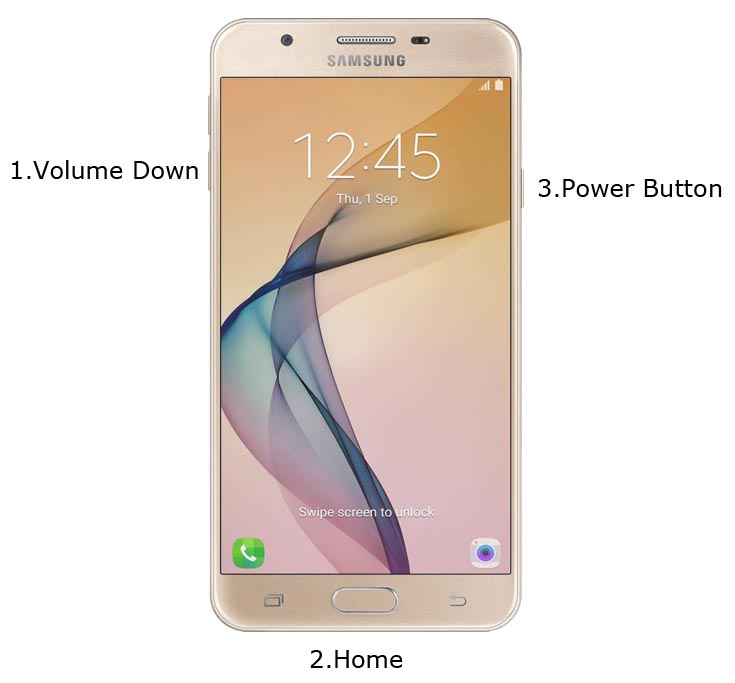
Samsung J5 Prime Download Mode


  • Restart the device. Then, enter into Download mode. To do this; press and hold down the Volume Down + Home+ Power buttons at the same time for some time.
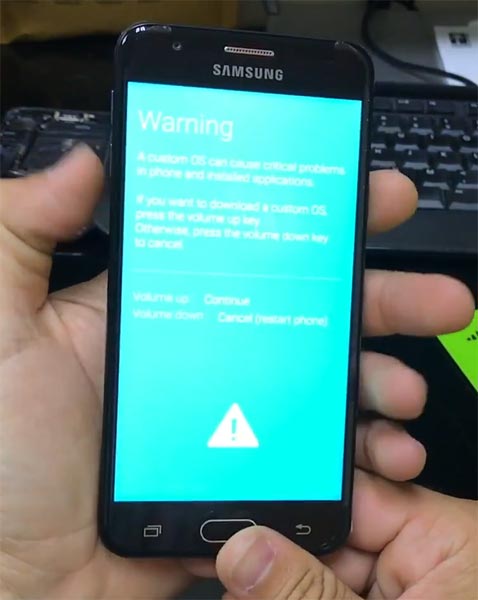
Samsung J5 Prime Download Mode Warning Screen


  • Press the Volume Up button to continue when you see the warning message.

  • Now, connect the J5 Prime mobile to the computer via USB cable.

  • Launch the Odin app on your computer. If the device is detected by this app (Odin), it will show you a message that reads – added!!!
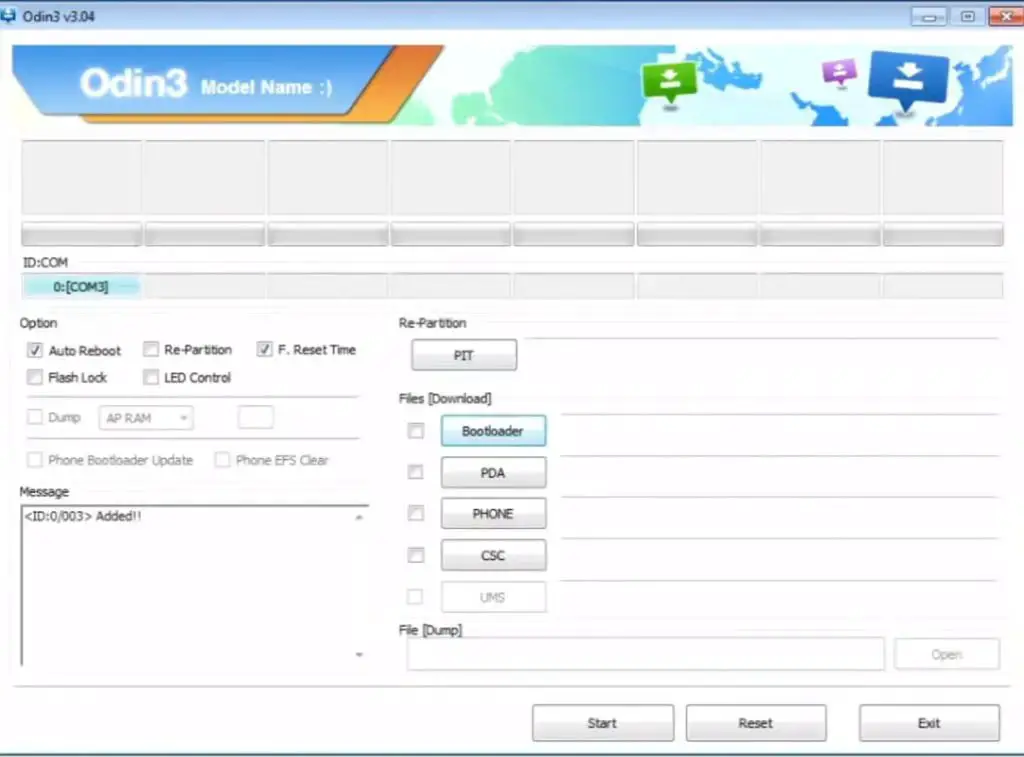
ODIN Added Message


However, if the device is not correctly connected to the PC, you won’t see this message. So, you have to check the USB cable if it is good and reconnect the device.

  • After connecting the Samsung device, click on the PDA/PA button to browse/search and get the TWRP from where you saved it on your PC. Also, navigate to “options” and un-tick the Auto-Reboot.
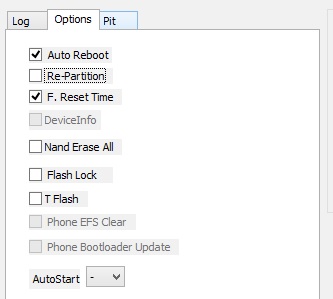
Odin Auto Reboot

  • Click on “Start”

  • Once the file is loaded into the device, reboot your device.

  • Kudos, you have just Installed the TWRP on your Samsung Galaxy J5 Prime. If you installed TWRP, Don’t turn on your mobile. Immediately, move to Magisk Installation steps.

Install Magisk in your Samsung Galaxy J5 Prime using TWRP

  • Boot it Into recovery mode->Volume Up+ Home +Power Button.
  • Now it Will Boot into TWRP Recovery Mode.
  • Select Wipe->Advance Wipe->Select Cache Data.
  • Return to Home of TWRP select Install.
  • Select Magisk.Zip.
  • After the Installation Reboot Your Mobile.
  • You can also install Magisk Manager in your Mobile Applications. You can check Root status using Root Checker.

What More?

Samsung Galaxy J5 Prime model has some Glitch in recent software updates. So, If you have little knowledge in tech, I advise you to Root and uninstall some unwanted apps. You can also flash some Custom ROMs. If you flash Custom ROM, check what is working and what is not working. It is wise to use Some Official Custom ROMs like Lineage.

Selva Ganesh

Selva Ganesh is a Chief Editor of this Blog. He is a Computer Engineer, An experienced Android Developer, Professional Blogger & addicted Web Developer. He runs Android Infotech which offers Problem Solving Articles around the globe.

Related Posts:

  • New things in Samsung Galaxy Note 20 and Ultra
  • Android Mobiles Secret Hidden Codes For All Manufacturers
  • Fix Samsung Galaxy S10 Lite SM-G770F/U1 Stuck on Boot Start…
  • Troubleshoot Samsung Galaxy A50 SM-A505 Freeze Not Responding issues
  • Fix Samsung Galaxy Note 10 Lite SM-N770F Stuck on Boot Start…
  • Unfreeze Not Responding Non-Removable Battery Android Mobiles
Share This Post:

Tagged With: Samsung

Reader Interactions

Comments

  1. Hasib says

    June 17, 2019 at 8:22 pm

    Thank u So much

    Reply
    • Selva Ganesh says

      June 17, 2019 at 8:54 pm

      Thank you..:)

      Reply
  2. Joshua says

    July 15, 2019 at 7:57 pm

    Hi i have followed all your instructions yet i am having a signiture verification error ? it boot into normal recocery and not twrp then says no command . i have tried to sideload the magisk but thats when i get the verification error . please help me . on my j5 prime sm-gm570f.

    Reply
    • Selva Ganesh says

      July 15, 2019 at 8:13 pm

      You should boot into first boot into TWRP recovery. Or Else you will lose root access. Don’t Sideload Magisk. Copy the file before the process.

      Reply
  3. Kupal Kumar says

    August 10, 2019 at 1:55 pm

    Bro, how to turn off the phone after loading the.tar file

    Reply
    • Selva Ganesh says

      August 10, 2019 at 2:10 pm

      Press Volume Up+ Power Button to boot into TWRP, so that you can flash Magisk. Long Press power button to Turn off and Press Volume Up to Exit download mode.

      Reply
  4. Raj says

    August 26, 2019 at 11:57 pm

    Bro how to change IMEI number sm j7

    Reply
    • Selva Ganesh says

      August 27, 2019 at 1:03 pm

      It is hardware related. You should contact nearby Mobile Shops. They can help you with this.

      Reply
      • Uche says

        September 26, 2019 at 5:26 pm

        I successfully installed the custom recovery and installed magical too but I started showing signature verification error during boot, It asked me to reset and wipe the phone which I already did, after successfully booting, it started showing in the notification panel “unauthorized actions have been detected, restart your device to undo any unauthorized changes” even after restarting, it keeps showing it. How do I fix it? I think it triggered the Knox too; it’s no longer working.

        Reply
        • Selva Ganesh says

          September 26, 2019 at 7:25 pm

          Flash no-verity. I attached the link below. Also, Check the RMM state is off. If RMM state is on, you have to flash RMM state Bypass also.

          http://www.androidinfotech.com/no-verity-opt-encrypt-versions/

          Reply
  5. vinciverde says

    August 31, 2019 at 2:03 pm

    i freaking love you bro thanks more power

    Reply
    • Selva Ganesh says

      August 31, 2019 at 6:18 pm

      Thank you…Appreciated..:)

      Reply
  6. sahil setia says

    September 20, 2019 at 11:19 pm

    hey there I was trying to root my phone with these steps, and I think I have lost my phones software and now my phone got stuck on boot mod and cant turning on, please tell me how I can reinstall my rom and my phone reuseable
    plz reply asap

    Reply
    • Selva Ganesh says

      September 21, 2019 at 12:29 pm

      No need to panic, Flash Stock Firmware using ODIN. You will get your device back. But, If you want to root again, Don’t wipe system data in Cache partition. I think you erased OS accidentally.

      Reply
  7. Sohel Rana says

    September 28, 2019 at 11:18 pm

    Give me a Video tutorial. All steps are very important.

    Reply
    • Selva Ganesh says

      September 29, 2019 at 5:08 am

      Currently, We can’t do anything, What you ask for. We are working on our channel. We will soon release.

      Reply
  8. Aniruddh says

    October 2, 2019 at 7:45 pm

    Will memory get wiped?

    Reply
    • Selva Ganesh says

      October 3, 2019 at 12:12 pm

      No. Unless, You accidentally wipe system data in TWRP. But, It is better to take complete backup.

      Reply
  9. sebastian grajales says

    October 16, 2019 at 2:06 am

    hola la copia de seguridad me guarda la contraseas del wifi. me da susto de que me toque formatear el cel cuando lo rootee

    Reply
    • Selva Ganesh says

      October 16, 2019 at 2:39 pm

      Este método raíz no borrará los datos del usuario. Pero, es mejor hacer una copia de seguridad de su dispositivo móvil utilizando TWRP Recovery en el primer arranque.

      Reply
  10. Precious Anthony says

    October 17, 2019 at 6:22 am

    pls, my volume keys are not working in my Samsung galaxy j5 prime 2. what the other possible options I can use are?

    Reply
    • Selva Ganesh says

      October 17, 2019 at 12:08 pm

      What is your model number? Where It happens? Did you get “PASS” in ODIN?

      Reply
  11. What a day says

    October 28, 2019 at 7:31 pm

    I went about doing as you asked as I tried to boot into recovery mode; however, the phone started flashing the Samsung logo and turning off and on. Please help, I don’t know what to here.

    Reply
    • What a day says

      October 28, 2019 at 7:34 pm

      Forgot to mention, I can only go into download mode, and it is impossible to go into recovery mode.

      Reply
      • Selva Ganesh says

        October 28, 2019 at 8:14 pm

        You are stuck at Download Mode. What We can do here is we have to flash Stock Firmware and Boot into Normal OS. After everything back to normal, you can again try Rooting.
        Refer Below.
        http://www.androidinfotech.com/samsung-galaxy-j5-prime-sm-g570f-m-y-oreo/

        Reply
  12. fotso says

    October 31, 2019 at 10:47 pm

    mon telephone est resté bloqué sur le mode et refuse de redémarrer malgré toutes les combinaison.
    svp comment faire?

    Reply
    • Selva Ganesh says

      November 1, 2019 at 12:08 pm

      Avez-vous décoché le redémarrage automatique dans ODIN? Si vous ne pouvez pas démarrer dans le système d’exploitation, passez en mode de récupération en appuyant sur le bouton Volume en haut+, puis effacez les données de l’utilisateur. Ne pas supprimer les données du système.

      Reply
  13. IVAN DIONELA says

    November 19, 2019 at 6:58 pm

    I TRIED MANY TIMES TO BECOME A DEVELOPER BUT THE DEVELOPER SETTINGS STILL DONT SHOW

    Reply
    • Selva Ganesh says

      November 19, 2019 at 7:13 pm

      Go to Settings>About>Build Number>Tap (Touch) on Build number 7 times. It will say, Now you are a Developer. Go to Settings>Developer Options.

      Reply
  14. marcin says

    January 3, 2020 at 1:19 am

    I have a j5 prime, and it is not working.
    Odin fails to install TWRP
    I have android 8.0.0
    kernel ver. Aug. 9, 2019
    Android security patch level August 1, 2019

    Reply
    • Selva Ganesh says

      January 3, 2020 at 12:06 pm

      You didn’t enable USB Debugging/OEM Unlock. Enable both of them.

      Reply
      • marcin says

        January 4, 2020 at 9:53 am

        I did enable those. I followed all instructions carefully.

        Reply
        • Selva Ganesh says

          January 4, 2020 at 12:51 pm

          Can you mention your current build number?

          Reply
  15. Anne says

    January 16, 2020 at 9:10 pm

    Hi, I followed your instructions and installed TWRP but didn’t manage to boot my phone into TWRP recovery mode, but it kind of automatically goes back to the standard android recovery mode. Can you help, please?

    Reply
    • Selva Ganesh says

      January 17, 2020 at 11:56 am

      You should un-tick the Auto-Reboot into ODIN. After the TWRP Flash, Press Volume Down+ Power to ext download mode and immediately press the volume up+ Power to enter into recovery mode.

      Reply
      • neil cenabre says

        March 16, 2020 at 9:51 pm

        Hi, after I followed that step, my phone turns on pls help! What should I do now?

        Reply
        • neil cenabre says

          March 16, 2020 at 10:03 pm

          and now it says no command and it takes me to android recovery

          Reply
          • Selva Ganesh says

            March 17, 2020 at 1:18 pm

            Stock Recovery or TWRP?

        • Selva Ganesh says

          March 17, 2020 at 1:18 pm

          Can you mention the error?

          Reply
          • kunalsingh says

            June 29, 2020 at 11:46 am

            Stock recovery and after playing with my buttons, it turned on.
            Every time I try to install twrp, this type of thing happens, please what to do…

          • Selva Ganesh says

            June 29, 2020 at 2:56 pm

            You should press Volume Up+Power Button immediately after exit download mode.

  16. lea says

    January 20, 2020 at 4:05 am

    amigo tengo un galaxy j5 prime sm -g570 instale odin en mi computadora y no encuentro la opcion de PDA/ PA

    Reply
    • Selva Ganesh says

      January 20, 2020 at 2:00 pm

      Puede usar AP / PDA.

      Reply
  17. Krishna says

    February 15, 2020 at 5:59 pm

    Hello brother,
    My specs are:
    SM-J570F
    Android 8.0
    kernel ver. Aug. 9, 2019
    Android security patch level August 1, 2019
    But when trying to download via Odin, the twrp file you provided always throws the error: check fail-> device 1, binary 0, and the process fails.
    I am guessing there is some binary version related issue. Kindly point me in the right direction.

    Reply
    • Selva Ganesh says

      February 15, 2020 at 8:19 pm

      The real problem is your mobile detects the TWRP is not matching with your current firmware. Try with the latest version of ODIN. If the problem persist, try with Magisk only method.

      Reply
  18. Cleison says

    March 4, 2020 at 7:35 am

    My experience as of 2020:
    My phone is an SM-G570M with Android Oreo 8.0, the latest version. I could only flash TWRP after downloading the newest version on5xelte; otherwise I was always getting a message saying that I was trying to flash an older version than my phone had installed. Then, I’ve been attempting to install Magisk without wiping my phone (didn’t want to lose my data), but people said that some encryption doesn’t allow TWRP to access any folders until you wipe all data. I could install Magisk from the SD card, but it corrupted something, and my phone asked for a factory reset when booted. Then it powered off and didn’t power on anymore; I had to flash stock rom again and try this process from the start. So, my advice to anyone trying this in 2020 is to make a backup and wipe all your data from TWRP.

    Reply
    • Vladimir says

      March 24, 2020 at 10:05 am

      Hola tengo el g570m dúos kernel 6 febrero 2020 patch seguridad de febrero 2020 binario 8 no encuentro como desbloquear el bootloader twrp y root me ayudas te agradecería mucho

      Reply
      • Selva Ganesh says

        March 24, 2020 at 2:03 pm

        El método puede admitir hasta Oreo independientemente de la actualización del parche de seguridad. Si tiene algún problema durante el proceso, puede comentar nuevamente.

        Reply
  19. Joe says

    April 14, 2020 at 8:04 am

    Hi,
    I tried to root my phone using those following steps and my twrp recovery passed in Odin, but when I got into custom recovery I couldn’t find the magisk rar in the internal storage I did install magisk rar before the rooting process and also wiped out the cache data, but my internal storage is showing 0mb data
    Could you please help me.

    Reply
    • Selva Ganesh says

      April 14, 2020 at 9:06 pm

      Copy the Magisk file to the SD card. Flash no-verity encrypt before flashing Magisk.

      Reply
  20. jay mercado says

    July 31, 2020 at 9:35 pm

    After deleting the cache data, I cannot find magisk.zip on my internal storage while in TWRP. DO not reboot your system. Just simply download the magisk.zip on your PC and connect your phone via USB.

    Transfer the magisk.zip to your phone from your PC, and then install it from there.

    Reply
    • Selva Ganesh says

      July 31, 2020 at 9:42 pm

      You can also use External storage.

      Reply
  21. kh says

    August 15, 2020 at 8:25 pm

    Do not need there is no verity opt encrypt.

    Reply
    • Selva Ganesh says

      August 15, 2020 at 9:04 pm

      When you face encryption issues in TWRP, you can flash the file.

      Reply
  22. jahid says

    December 19, 2020 at 2:34 am

    Hey dear, when I tried to use Odin, it failed and showed “SYSTEM REV CHECK FAIL DEVICE.”
    Then I read all of your answers and tried to install only magisk.
    but it shows ‘signature verification error.’
    what should I do?

    Reply
    • Selva Ganesh says

      December 19, 2020 at 9:18 pm

      Can you remember your mobile patch month? Mention your model number.

      Reply
  23. Hamza Kaleem says

    January 17, 2021 at 6:24 am

    Bro, I have a Samsung Galaxy J5 Prime (SM-G5700). I only found its TWRP file on a single website when I installed it through Odin and tried to enter the recovery mode; it displays recovery mode can’t found couldn’t open it. Then there is a whole download mode type menu in front of the Samsung logo. I also tried to install the file of SM-G570f, but it showed me the same error. Can u please tell me what the error how to fix it?
    Thank You

    Reply
    • Selva Ganesh says

      January 18, 2021 at 3:06 pm

      You should not flash the different TWRP file. Try to flash the correct TWRP once available.

      Reply
  24. Zidni says

    March 28, 2021 at 5:16 pm

    I’m sorry, bro, I’m a noob. I just want to ask how do we know that the process has been completed? I have been waiting that so long time, but i didn’t see the Odin was running

    Reply
    • Selva Ganesh says

      March 29, 2021 at 3:24 pm

      Press Volume Down+ Power to exit download mode after you get “PASS” in ODIN.

      Reply

Leave a Reply Cancel reply

Your email address will not be published. Required fields are marked *

This site uses Akismet to reduce spam. Learn how your comment data is processed.

Primary Sidebar

Join With Us

Recent Posts

  • How to get Free Samsung Galaxy A32 5G in T-Mobile with Any Mobile Trade-In?
  • Google Pixel 6 will use In-House Whitechapel Processor
  • Download Xiaomi Redmi Note 10 Pro/Max MIUI 12 Android 11 ROM
  • How to Solve Google I/O 2021 Virtual Event Date Reveal Puzzle?
  • Download Samsung Galaxy A70 SM-A7050/F/FN/GM/MN/U/W/YN Android 11 One UI 3.1 Stock Firmware

Today Tip

Samsung Galaxy A32 5G Home Screen 90Hz Check

How to get Free Samsung Galaxy A32 5G in T-Mobile with Any Mobile Trade-In?

After T-mobile acquire Sprint, It becomes one of the leading carriers in the US. Even before Sprint … [Read More...] about How to get Free Samsung Galaxy A32 5G in T-Mobile with Any Mobile Trade-In?

Advertisement

Copyright © 2021 AndroidInfotech.com, All Rights Reserved, Android is a trademark of Google Inc. All contents on this blog are copyright protected and should not be reproduced without permission.

  • Subscribe
  • Sitemap
  • About Us
  • Contact Us
  • Privacy Policy
  • Disclaimer
  • Our Image License
  • Hosted on Google Cloud
  • Ad Partner Ezoic