• Skip to primary navigation
  • Skip to main content
  • Skip to primary sidebar
Android Infotech

Android Infotech

Android Tips, News, Guide, Tutorials

  • Applications
  • Knowledge
  • I’m Bored
  • Opinion
  • Tutorial
  • Root
  • Firmware
  • Daily Deals
Home » Root » Root Samsung Galaxy S8 Plus SM-G955F Pie 9.0 using TWRP

Root Samsung Galaxy S8 Plus SM-G955F Pie 9.0 using TWRP

Last updated on April 21, 2019 By Selva Ganesh19 Comments

Samsung Galaxy S8 Plus received One UI Pie 9.0 Update. So, the OS is pretty good and better than Old OS UI. But, If you are not satisfied with the UI, or you need root access to use some Root required apps, you can now root your device using the below methods. In My opinion, with this OS, Snapdragon 835 processor and 6 GB RAM are more than enough to manage High resource required tasks. And Also the Pie update is well optimized with a lot of features. If you have a good reason and you know what you are doing, follow the below steps, to achieve root on your device.
Samsung Galaxy S8 Plus with Small Plant

Table of Contents

  • Why should you Root Samsung Galaxy S8 Plus?
  • How to Root Samsung Galaxy S8 Plus SM-G955F Pie 9.0
    • Things to check out for;
    • Pre-Requirement Steps
    • Flash TWRP using ODIN
    • Install Magisk, no-verity-opt-encrypt and RMM State in your Samsung Galaxy S8 Plus using TWRP
  • What More?

Why should you Root Samsung Galaxy S8 Plus?

You should have a strong reason for rooting. Samsung Already released One UI 9.0 Pie and is already optimized. You have Enough 6 GB RAM to use daily apps without Lag. But beyond, you are addicted to some root apps, or you are a frequent user of some Custom OS, you can proceed further. But if you want to root because everybody is doing, I advise you, don’t root If you didn’t have any experience.

How to Root Samsung Galaxy S8 Plus SM-G955F Pie 9.0

Samsung Galaxy S8 Plus International variants come with a flexible bootloader. This means that the smartphone can be easily rooted. Also, the device can accept to install TWRP recovery or any other custom recovery file/app alike. Don’t try with Snapdragon US Variants like Verizon devices. They come with locked Bootloader.

TWRP recovery is a custom recovery file which must be installed on Samsung Galaxy devices because you can root them successfully. In this article, we explained the easiest method to follow and install TWRP recovery on Samsung Galaxy S8 Plus. However, the tool required for rooting this device is the Magisk App.

With the help of TWRP Recovery, you can quickly flash the latest version of Magisk into your S8 Plus to gain root access. Before sharing the tutorial, you may want to know that, with the TWRP recovery present on your device, you can easily install any custom ROM or firmware. Does it seem complicated? Relax, everything will be explained succinctly in bullets.

Things to check out for;

  • Check your device model number.

  • Select TWRP Based on the mobile model number.
  • Make sure your device battery is charged above 50%

  • Backup your current files and data, just in case (save them on external storage).

Pre-Requirement Steps
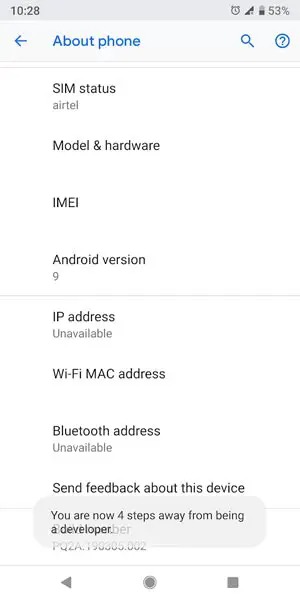
Enabling developer option

  • Enable USB Debugging Mode and OEM Unlock in your mobile. To do this; go to settings >>> about >>> Tap on the “Build Number” 7-10 times consistently to enable “Developer Options,” then go to the “Developer Options” and enable USB Debugging Mode and OEM Unlock. There is no complicated process in the Samsung Galaxy S8 Plus.

  • Download and install the Samsung USB driver to your computer system.

  • Also, download the ODIN software. Select the above Oreo version in the ODIN list. Install ODIN on your PC.

  • Download Magisk.Zip (Download Latest version), no-verity-opt-encrypt (Latest version) and RMM State Bypass, Copy it to Your External SD Card Storage Memory. We Need to flash RMM State to avoid OEM Lock automatically in the future after the Root process.
  • Download and save the TWRP File. Select the Correct TWRP file from Below. This TWRP can support Up to Pie 9.0. Choose the latest .tar file.

  • SM-G955F

Flash TWRP using ODIN

Samsung S8 Plus Download Mode

  • Connect your USB Cable with PC. Switch off your device. Then, enter into Download mode. To do this; press and hold down the Volume Down + Bixby + Power Buttons buttons and connect your Type-C USB Cable.
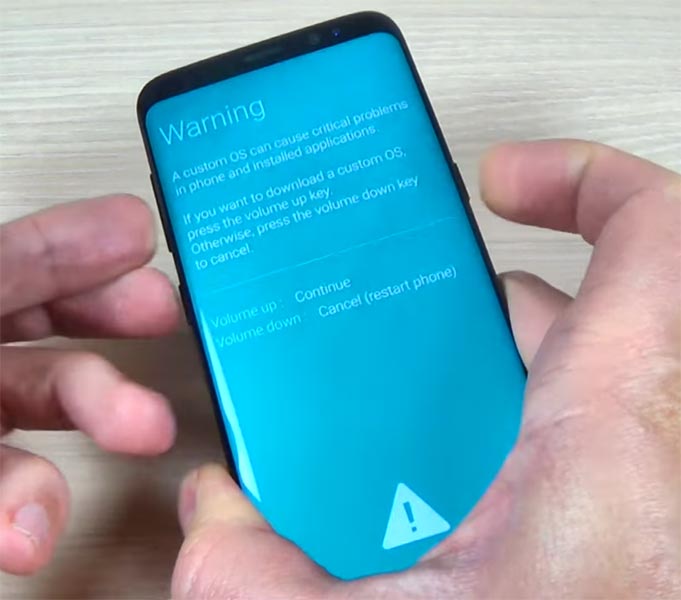
Samsung S8 Download Mode Warning message


  • Press the Volume Up button to continue when you see the warning message.

  • Now, connect the Samsung Galaxy S8 Plus mobile to the computer via USB cable.

  • Launch the Odin app on your computer. If the device is detected by this app (Odin), it will show you a message that reads – added!!!
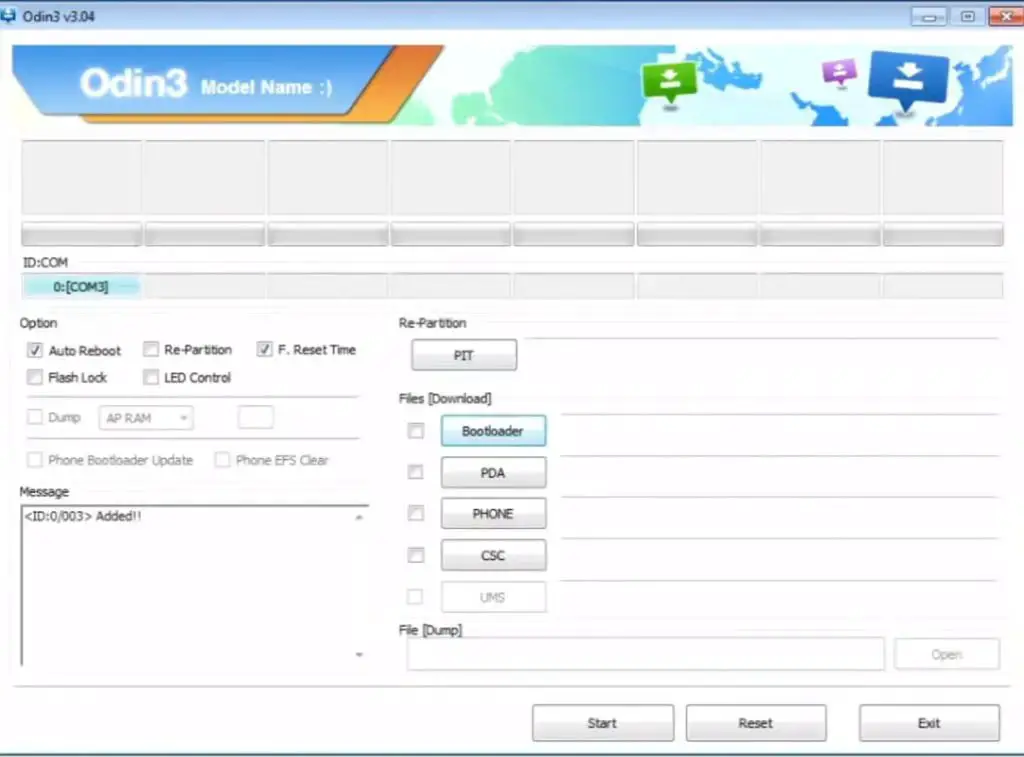
ODIN Added Message


However, if the device is not correctly connected to the PC, you won’t see this message. So, you have to check the USB cable if it is reasonable and reconnect the device.

  • After connecting the Samsung device, click on the PDA/PA button to browse/search and get the TWRP from where you saved it on your PC. Also, navigate to “options” and tick the Auto Reboot.
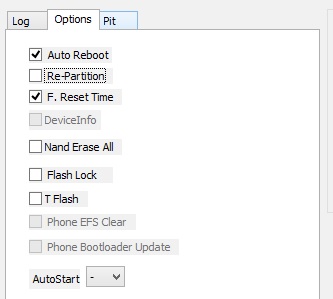
Odin Auto Reboot

  • Click on “Start”

  • Once the file is loaded into the device, reboot your device.

  • Kudos, you have just Installed the TWRP on your Samsung Galaxy S8 Plus. If you installed TWRP, Don’t turn on your mobile. Immediately, move to Magisk Installation steps.

Install Magisk, no-verity-opt-encrypt and RMM State in your Samsung Galaxy S8 Plus using TWRP

  • Boot it Into recovery mode->Volume Up + Power Button.
  • Now it Will Boot into TWRP Recovery Mode.
  • Select Wipe->Advance Wipe->Select Cache Data.
  • Return to Home of TWRP select Install. Select Magisk.Zip.
  • After Installation again Navigate to Home select Install. Select RMM State Bypass.
  • Now again Return to Home of TWRP select Install and navigate to no-verity and install .zip file.
  • After the Installation Reboot Your Mobile.
  • You can also install Magisk.apk in your Mobile Applications. RMM State is used to avoid OEM Lock after rooting.

What More?

You should not Boot into Normal OS Booting, after TWRP. After TWRP Flash, Immediately Boot into Recovery or Else you will get Warning message FRP Lock. If you accidentally urged and boot frequently, Don’t panic, flash official S8 plus stock firmware to get back into stock OS. If you root your device, because of the battery drain issues, you can optimize your battery without root.

Selva Ganesh

Selva Ganesh is a Chief Editor of this Blog. He is a Computer Engineer, An experienced Android Developer, Professional Blogger & addicted Web Developer. He runs Android Infotech which offers Problem Solving Articles around the globe.

Related Posts:

  • Troubleshoot Samsung Galaxy A50 SM-A505 Freeze Not Responding issues
  • Fix Samsung Galaxy Note 10/10 Plus SM-N970/N976/N986 Stuck on…
  • Check My Phone is Carrier Unlocked or Not and Unlock legally for Free
  • Fix Samsung Galaxy A51/5G SM-A515/A516 Stuck on Boot Start Screen logo
  • Fix Samsung Galaxy Note 20 5G/Ultra SM-N981/N986 Stuck on Boot…
  • Fix Samsung Galaxy M21 SM-M215F Stuck on Boot Start screen logo
Share This Post:

Tagged With: Samsung

Reader Interactions

Comments

  1. Danisays

    August 28, 2019 at 1:02 pm

    Does not work on Galaxy s8+ with actual software version 9.

    Reply
    • Selva Ganeshsays

      August 28, 2019 at 9:04 pm

      What is your Model number? The Above method will work only with SM-G955F.(International Variant)

      Reply
  2. Abdulrahman Dirdabsays

    September 9, 2019 at 9:02 pm

    This locked my phone, and I lost all my data, I used an s8+ SM-G955F. And it gave me verification failed.

    Reply
    • Selva Ganeshsays

      September 10, 2019 at 12:21 pm

      Did you get this During TWRP Flash? Or Magisk Installation? You should flash Magisk in the First Boot, Or Else you will lose root access. Flash RMM State to avoid Bootloop issues. You can Flash Firmware to repair your mobile.

      Reply
      • Xaysays

        September 10, 2019 at 12:28 pm

        So is a US variant one without the oem unlock in Dev options?

        Reply
        • Selva Ganeshsays

          September 10, 2019 at 12:53 pm

          SM-G955F is an International Variant With Exynos processor. US Variants have Snapdragon Processor With Model Number “SM-G955U”. Yes, US Variants, should be treated in Another way. This method will not work with those variants.

          Reply
  3. Sumonsays

    October 23, 2019 at 5:36 pm

    Sir can I root sm-g955n with this your step. Please, I need help.

    Reply
    • Selva Ganeshsays

      October 23, 2019 at 8:08 pm

      No. Each model number need different TWRP. But, You have the International variant. It may or may not Compatible with your model. If you try, Take complete Backup before proceeding.

      Reply
  4. Mehsays

    March 17, 2020 at 9:13 pm

    Don’t turn on your mobile. Immediately, move to Magisk Installation steps.
    Reboot, but don’t turn it on?

    Reply
    • Mehsays

      March 17, 2020 at 9:37 pm

      I get verification failed. I have an SM-G955F.

      Reply
    • Selva Ganeshsays

      March 18, 2020 at 10:37 am

      You don’t have to boot into regular OS on the first boot after the TWRP flash.

      Reply
      • Mehsays

        March 20, 2020 at 2:01 pm

        Well, in any case, it doesn’t work, as I get verification failed after following the guide.

        Reply
        • Selva Ganeshsays

          March 20, 2020 at 8:07 pm

          You can try with the latest twrp-3.3.1-1-dream2lte.img.tar file. We updated the post.

          Reply
          • Marlonsays

            March 31, 2020 at 4:00 am

            Does it still work on the latest firmware or security patch?

          • Selva Ganeshsays

            March 31, 2020 at 2:17 pm

            It can support up to the Pie version.

  5. Matsays

    May 7, 2020 at 7:23 pm

    Followed the steps with Odin v3.14.
    After flashing the twrp, the phone restarted automatically. I turned it off and went into recovery mode. I then proceeded as you wrote.
    However, during the install of the zips, there were errors that /data and /preload could not be mounted.
    Now the phone is stuck in a boot loop and “verification failed” message. Did I miss a thing?

    Reply
    • Selva Ganeshsays

      May 9, 2020 at 2:52 pm

      Use the latest version of TWRP and Magisk.

      Reply
  6. kennysays

    August 8, 2020 at 6:45 pm

    mine is sm g9550.

    Reply
    • Selva Ganeshsays

      August 8, 2020 at 8:59 pm

      This method will work only on Exynos processor.

      Reply

Leave a Reply Cancel reply

Your email address will not be published. Required fields are marked *

This site uses Akismet to reduce spam. Learn how your comment data is processed.

Primary Sidebar

Join With Us

Recent Posts

  • Download Xiaomi Mi 10 Lite 5G MIUI 12 Android 11 ROM
  • Samsung officially launched 5nm Exynos 2100 Processor
  • Samsung Galaxy J8 SM-J810F/G/M/Y Modes, Reset and SAR Value
  • Root Xiaomi Poco F2 Pro Android 10/11 using TWRP and Magisk
  • Use Old Galaxy Mobiles as Baby Monitor and Security Devices with Samsung Upcycling program

Today Tip

Samsung Exynos 2100 Processor Render

Samsung officially launched 5nm Exynos 2100 Processor

Samsung has missed feedbacks in every product. Even if they have heavy competition in mobiles, They … [Read More...] about Samsung officially launched 5nm Exynos 2100 Processor

Advertisement

Copyright © 2021 AndroidInfotech.com, All Rights Reserved, Android is a trademark of Google Inc. All contents on this blog are copyright protected and should not be reproduced without permission.

  • Subscribe
  • Sitemap
  • About Us
  • Contact Us
  • Privacy Policy
  • Disclaimer
  • Our Image License
  • Hosted on Kinsta
  • Ad Partner Ezoic