• Skip to primary navigation
  • Skip to main content
  • Skip to primary sidebar
Android Infotech

Android Infotech

Android Tips, News, Guide, Tutorials

  • Applications
  • Knowledge
  • I’m Bored
  • Opinion
  • Tutorial
  • Root
  • Firmware
  • Daily Deals
Home » Root » Root Moto G5 and Moto G5 Plus Oreo 8.1 using TWRP and Install Magisk

Root Moto G5 and Moto G5 Plus Oreo 8.1 using TWRP and Install Magisk

Last updated on April 25, 2019 By Selva Ganesh36 Comments

Moto G5 and G5 plus were the Great Mid-Range phones when they released. The reason is that even if specs are reasonable, Moto Near Stock Android OS is excellent. Moto is releasing some unplanned security patch updates once in a While. But there is no chance for the Pie Update. It can be used for 1-2 Years If you are a regular user. But, if you are a Flash Guy, who already have or used rooted device, You can Now see the Slow and Laggy performance compare with the New devices. So, Yes, you can Enhance the performance by rooting. To do that, follow the below steps carefully. Don’t skip any steps.
Moto G5 Plus with Leaf Background

Table of Contents

  • Why should you Root Moto G5 and G5 Plus?
  • How to Root Moto G5 and G5 Plus Oreo 8.1 (XT1684, XT1685, XT1687, XT1686)
    • Things to check out for;
    • Pre-Requirement Steps
    • Unlock Bootloader using ADB and Fastboot
    • Flash TWRP
    • Install Magisk and no verity in your Moto G5 and Moto G5 Plus using TWRP
  • What More?

Why should you Root Moto G5 and G5 Plus?

You should have a proper reason, and you know what you are doing. Yes, with a minimum of 3 and 4 GB RAM and Mid-Range Qualcomm Snapdragon processor, You can use this mobile without root for 2-3 Years If you use correctly. Software is better compared with other manufacturers, Custom skin OS. Don’t root because everybody is saying when root your mobile it can become the fastest car in the world. No. Rooting is to extract some performance from the device. But, you already have Powerful specs and software. So, If you are addicted to some root apps, you can root. But, if you want to test, I won’t recommend it.

How to Root Moto G5 and G5 Plus Oreo 8.1 (XT1684, XT1685, XT1687, XT1686)

Moto G5 / G5 Plus International Variants comes with a flexible bootloader other than some carrier locked devices. This means that different smartphone variants can be easily rooted. Also, the device can accept to install TWRP recovery or any other custom recovery file/app alike.

TWRP recovery is a custom recovery file that must be installed on your devices because you can root them successfully. In this article, we explained the easiest method to follow and install TWRP recovery on Moto G5 Plus. However, the tool required for rooting this device is the Magisk App.

With the help of TWRP Recovery, you can quickly flash the latest version of Magisk into your Moto G5 Plus to gain root access. Before sharing the tutorial, you may want to know that, with the TWRP recovery present on your device, you can easily install any custom ROM or firmware. Does it seem complicated? Relax, everything will be explained succinctly in bullets.

Things to check out for;

  • Make sure your device battery is charged above 50%

  • Backup your current files and data, full data loss process (save them on external storage).

Pre-Requirement Steps
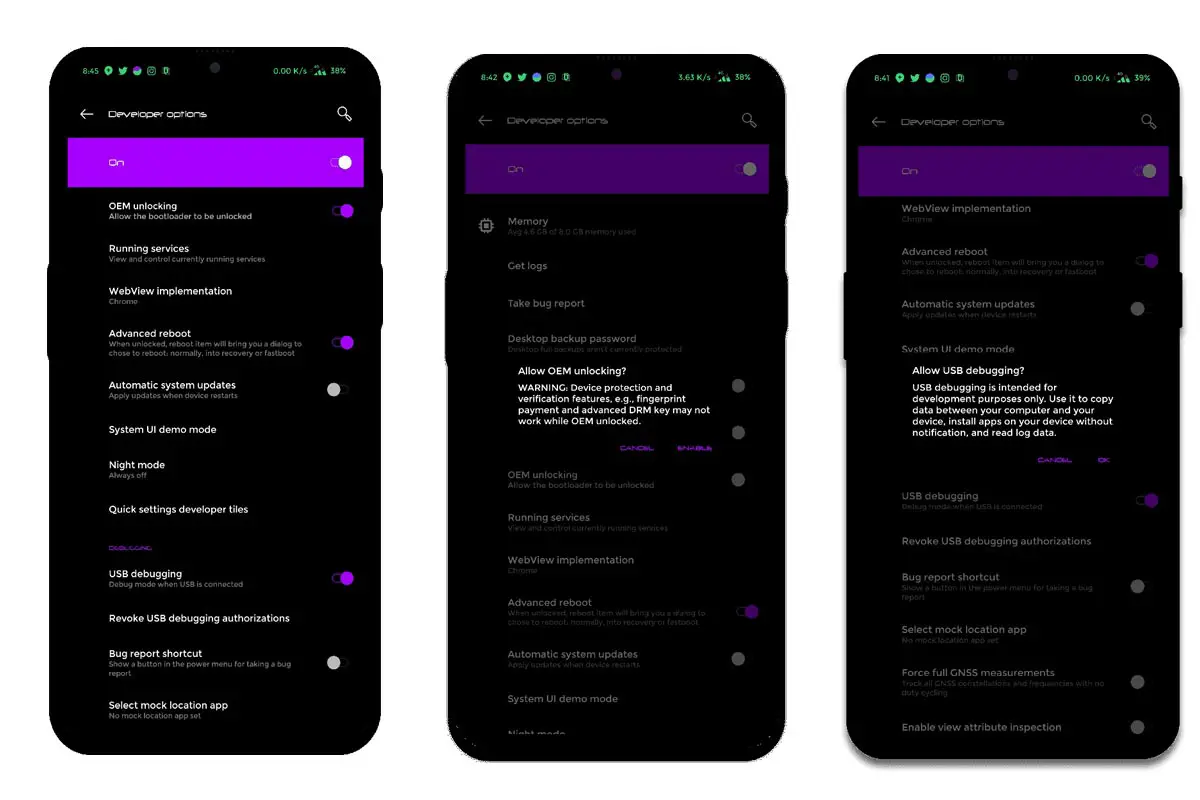
OnePlus 6T OEM Unlock and USB Debugging


  • Enable USB Debugging Mode and OEM Unlock on your mobile. To do this; go to settings >>> about >>> Tap on the “Build Number” 7-10 times consistently to enable “Developer Options,” then go to the “Developer Options” and enable USB Debugging Mode, OEM Unlock and Enable the ‘Advanced Reboot.’ There is no complicated process in Moto G5 and G5 Plus.

  • Download and install the Moto USB driver to your computer system.

  • Also, download the ADB drivers. Install it on your PC.

  • Download Magisk.Zip (Latest Version) and Copy it to Your Phone Memory.
  • no-verity-opt-encrypt Download (Latest Version) and Copy it to Your Phone Memory. This file helps you to maintain the Bootloader unlock in your device.
  • Download and save the TWRP File in your Installed ADB folder and rename it to recovery.img.

  • twrp-3.3.0-0-cedric.img (Moto G5)
  • twrp-3.3.0-0-potter.img (Moto G5 Plus)

Unlock Bootloader using ADB and Fastboot
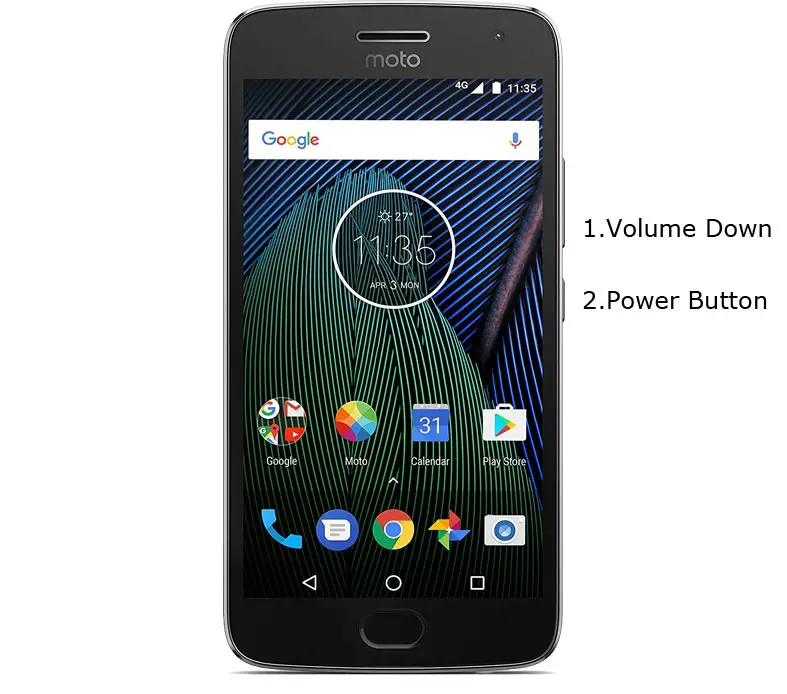
Moto G5 Plus Fastboot Mode


  • Switch off your device. Then, enter into Fastboot mode. To do this- Press and hold down the Volume Down + Power buttons at the same time for some time.
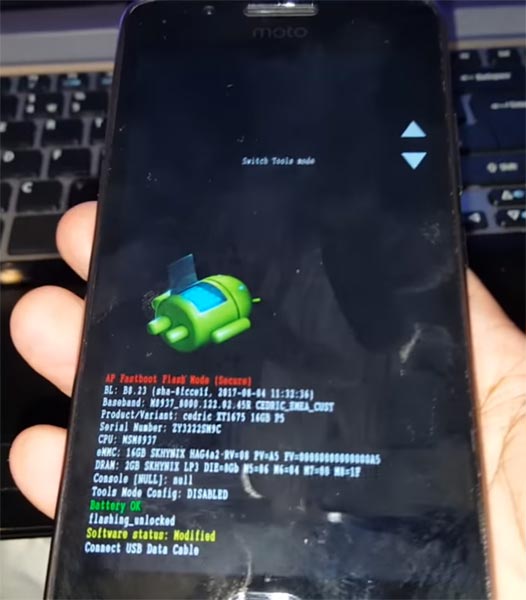
Moto G5 Plus Fastboot Mode Warning Screen


  • Press the Volume Up button to continue when you see the warning message.

  • Now, connect the Moto G5/G5 Plus mobile to the computer via USB cable.

  • Launch the fastboot on your computer. Open a Command prompt on your PC and type below command.

  • fastboot devices
  • It should display the connected devices. If you didn’t get the device, restart the command prompt and Disconnect and Connect your Moto G5/G5 Plus. If you are detected, type below commands.
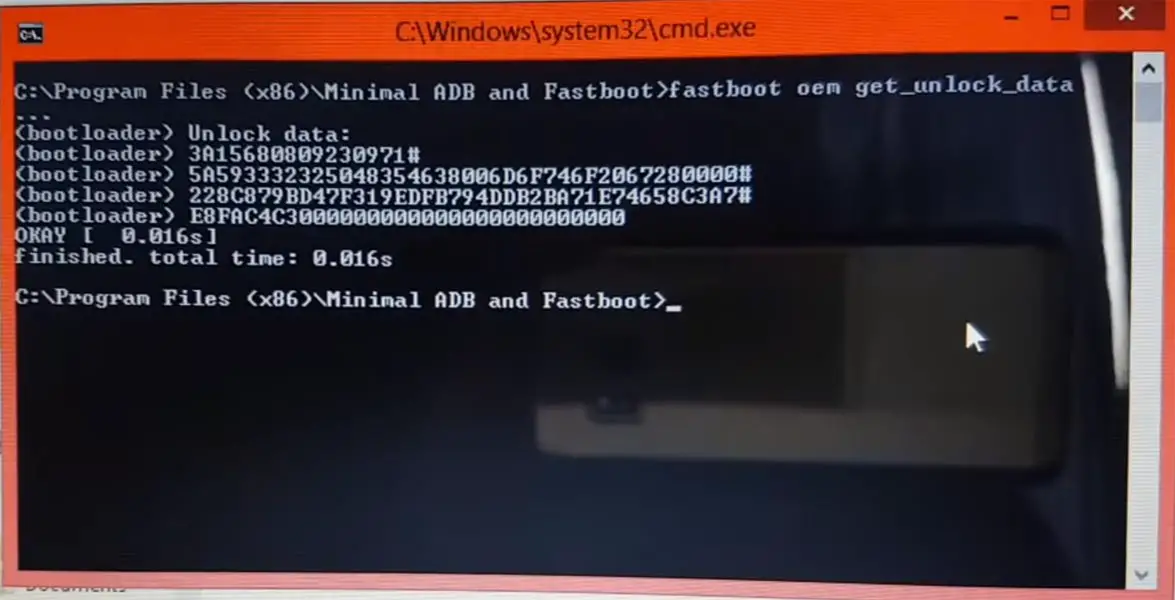
  • fastboot oem get_unlock_data

Moto Get Unlock Data


  • Hit enter, you will get some unlock data. Copy those codes and remove <bootloader> Prefix from those lines and copy them into one single line.
  • Go to Official Moto Unlock Page. Log in with your moto account and in the Box, Paste those codes and Check the unlock Bootloader Status. If you get, Yes you can unlock, You can request unlock Key from Moto.
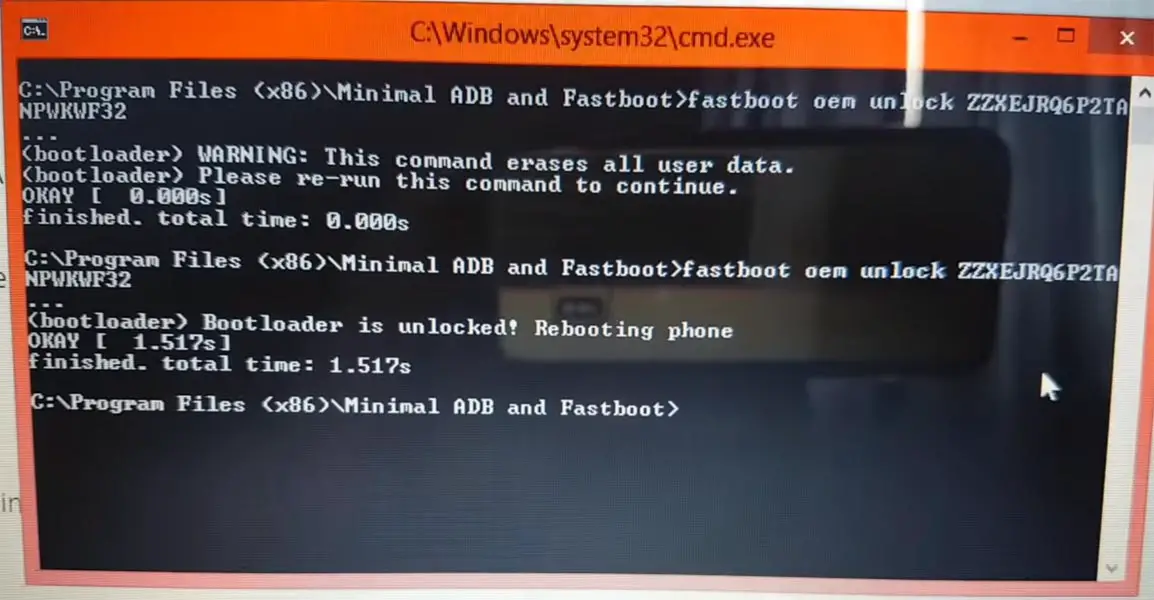
  • After the process completes, you will get 20 Digit to unlock the key in your email. Now type the following command to unlock bootloader in your device.

  • fastboot oem unlock UNIQUE CODE

Moto unlock bootloader command

  • You should type this code two times and Hit enter to unlock your device successfully. After the successful unlock, your device will automatically reboot to the standard OS.

  • Check again enable “Developer Options,” then go to the “Developer Options” and enable USB Debugging Mode, OEM Unlock and Enable the “Advanced Reboot.” Sometimes they disabled themself after the boot.

Flash TWRP

  • Switch off your device. Then, enter into Fastboot mode. To do this, press and hold down the Volume Down+ Power buttons after Android Logo Appears Still press the Power button and press Volume Up Button.
  • Now, connect the Moto G5/G5 Plus mobile to the computer via USB cable.

  • Launch the fastboot on your computer. Open a Command prompt on your PC and type below command.

  • fastboot flash recovery recovery.img
  • After the process complete, It will boot into the temporary TWRP. Don’t Boot into standard OS until we flash magisk.

Install Magisk and no verity in your Moto G5 and Moto G5 Plus using TWRP

  • Select Wipe->Advance Wipe->Select Cache Data.
  • Return to Home of TWRP select Install.
  • Select Magisk.Zip.
  • Again Return to Home of TWRP select Install.
  • Select no-verity-opt.Zip.
  • After the Installation Reboot Your Mobile.
  • You can also install Magisk Manager in your Mobile Applications.

What More?

As already mentioned, Moto G5/G5 Plus has a minimum of 3/4 GB RAM, and it is a Good software side phone; There are Major regular updates and monthly updates from Motorola for a long duration. So, if you are sure about what you are doing, you can root your device. Don’t Install any apps other than trusted sites on rooted devices. Third-party site apps can contain some background codes. So, Check twice before installing those apps.

Source

Selva Ganesh

Selva Ganesh is a Chief Editor of this Blog. He is a Computer Engineer, An experienced Android Developer, Professional Blogger & addicted Web Developer. He runs Android Infotech which offers Problem Solving Articles around the globe.

Related Posts:

  • Root Samsung Galaxy Tab S5e SM-T720 Android 10 using TWRP and Magisk
  • Root Samsung Galaxy J7 Refine 2018 SM-J737P Oreo 8.0 using…
  • Root Samsung Galaxy A8 Plus 2018 SM-A730F Pie 9.0 using Magisk…
  • Root Samsung Galaxy J8 SM-J810F/G/M/Y Pie 9.0 using TWRP and Magisk
  • Root Samsung Galaxy M10 SM-M105F/G/M/Y Pie 9.0 using TWRP and Magisk
  • Root Samsung Galaxy A8 2018 SM-A530F/N/W Pie 9.0 using Magisk…
Share This Post:

Tagged With: Motorola

Reader Interactions

Comments

  1. jovian ashersays

    June 2, 2019 at 9:17 am

    Is this guide updated and no risk of bricking my device?

    Reply
    • Selva Ganeshsays

      June 2, 2019 at 10:41 am

      It is purely Depends on you. But, If you follow our Guide correctly, Without skipping any step, You can root your mobile, without bricking.

      Reply
  2. tomsays

    July 3, 2019 at 5:42 am

    I got a little problem.
    Every time I tried to “fastboot boot twrp recovery.img”, I get the same message: “error: cannot load ‘recovery.img'”.

    I’m using a moto g5 plus and it is unlocked( get warning screen saying that).

    Where did I go wrong? Where exactly do I put the TWRP file?

    Reply
    • Selva Ganeshsays

      July 3, 2019 at 7:46 pm

      Put your recovery.img file, where your fastboot files are installed. Also, check your device is detected by Fastboot or not.

      Reply
      • Thomas McCallistersays

        November 16, 2019 at 2:41 am

        Where are the fastboot files installed? I cannot see them using file explorer on my PC. I just copied the TWRP image straight into the root of my phone’s memory. I am getting the same error where it says no such file or directory.

        Reply
        • Selva Ganeshsays

          November 16, 2019 at 12:21 pm

          You can find them in the adb folder. In the Local Disk C. Copy TWRP file to installed ADB Folder and do the process.

          Reply
    • Chanchitosays

      July 4, 2019 at 11:12 pm

      Maybe you changed the name of your TWRP file, it happened once to me, with the same error, you have to name it “recovery.img”, also if you use the PowerShell instead of the cmd window, you have to add .\ before every fastboot command. The other thing you can do is download the latest twrp for moto g5 plus (potter) from the official page of TWRP, I use the 3.3.0 version, and it works pretty well.

      Reply
      • Selva Ganeshsays

        July 5, 2019 at 7:46 pm

        Thank you for your Advice and Feedback. I hope this will Help other users.

        Reply
  3. AlejoVinassays

    July 4, 2019 at 11:04 pm

    Hey, I have a question, if I have a custom ROM, that deactivates root, can I flash magisk without the no-verify-encrypter thing?

    Reply
    • Selva Ganeshsays

      July 5, 2019 at 7:44 pm

      Most of the Custom ROM doesn’t require no-verity. It is used for encryption purpose. You can flash Magisk without this.

      Reply
  4. alesays

    July 29, 2019 at 12:06 pm

    moto g 5 todo bien

    Reply
  5. Umakantsays

    September 1, 2019 at 6:06 pm

    I am confused about this: ” Switch off your device. Then, enter into Fastboot mode. To do this; press and hold down the Volume Down+ Power buttons after Android Logo Appears Still press Power button and press Volume Up Button.”

    Reply
    • Selva Ganeshsays

      September 1, 2019 at 7:05 pm

      To Enter Into Fastboot Mode, We should Press Volume Down Button and Power Button, It Will Trigger Moto Logo. When the Logo Appears, Quickly Release the Volume Down key only. While Holding the Power Button press Volume Up button.

      Reply
  6. Umakantsays

    September 1, 2019 at 6:15 pm

    Hello Sir, the article is informative. I am planning to root my Moto G5 Plus (XT1686 Oreo 8.1.0) in order to recover data from internal memory. So if I root my device using this procedure, after the recovery of my data ( hope so), I want to unroot my device. If you could point to an article or any video using which I could unroot my device, it’ll be beneficial.
    – (Completely Noob Here).

    Reply
    • Selva Ganeshsays

      September 1, 2019 at 7:08 pm

      Ok. No Problem. After Install of the TWRP, You will Boot into TWRP recovery mode. When the TWRP Screen appears, Go to Backup and Take Complete Backup on your External SD Card. So, When anything goes wrong, we can revert back. Or you can flash the Stock Firmware. But, It will remove root access.

      Reply
  7. Dilip Choudharysays

    September 10, 2019 at 10:50 am

    I want root method for moto g5s plus ….

    Reply
    • Selva Ganeshsays

      September 10, 2019 at 12:35 pm

      We, Will, publish the Post Soon.

      Reply
  8. Rahulsays

    October 5, 2019 at 4:25 pm

    Hi,

    I need to recover contact, which is get deleted due to google synchronization. That is stored on the phone storage, not on google.

    I can recover contact after rooting the device with your method or any other way I can do.

    Reply ASAP.

    Reply
    • Selva Ganeshsays

      October 5, 2019 at 7:53 pm

      Go to Contacts google Website and check your contacts are deleted permanently or not. If you can’t find any contacts, you can try with the root method. If you can find contacts, Sign out your Google account and Sign in Again. Turn on Synchronization.

      Reply
  9. Ulfsays

    October 7, 2019 at 5:23 pm

    Hi, I have rooted my Moto G5plus after your description successfully, thanks!

    I wanted to test a tool that needs root access, but the app installation failed, superuser permission given, of course.
    Any idea is the Magisk root or the app that causes the problem?
    Cheers.

    Reply
    • Selva Ganeshsays

      October 7, 2019 at 7:17 pm

      If you can give SuperUser permissions properly, Then There may be a chance of a problem in the app.

      Reply
  10. ulisessays

    October 9, 2019 at 8:03 am

    Hi, there’s not Advanced Reboot in my devices’ developer options section.
    What should I do?
    Can I go ahead and skip it and make the rest of the list?.
    Thanks.

    Reply
    • Selva Ganeshsays

      October 9, 2019 at 12:23 pm

      You can skip that step and do other steps. Enable USB Debugging and OEM Unlock.

      Reply
  11. mcosays

    November 21, 2019 at 5:07 pm

    Hi, on “fastboot flash recovery recovery.img” I receive this warning (bootloader) Image not signed or corrupt. The device does not reboot into a temporary TWRP.
    Thanks.

    Reply
    • Selva Ganeshsays

      November 21, 2019 at 7:31 pm

      This is the official TWRP version. Try again or try with Different Updated version.

      Reply
  12. Leesays

    December 30, 2019 at 7:04 am

    Hi, I followed the guide and completed all steps then start to download ROM from XDA.
    However, I installed ROM to meet a problem in LTE can’t work, but WiFi and call are standard…
    I checked the issue in blowing two ROM’s, do I missing any steps?
    [ROM][OFFICIAL][10.0][POTTER] Pixel Experience [AOSP][2019/11/01]

    Reply
    • Selva Ganeshsays

      December 30, 2019 at 11:41 am

      There is a Latest version available on the official Pixel Experience ROM page. Use that.
      Timeline- 2019/12/23 22:15

      Reply
  13. Ceebongosays

    March 31, 2020 at 12:25 am

    Hi!
    Thanks for the informative post – keep up the good work! I have a Moto G5 Plus running Oreo 8.1 and am using the latest version of TWRP image twrp-3.3.1-0-potter.img
    I tried to install TWRP for a new recovery, but it fails:
    .\fastboot.exe flash recovery .\apk\twrp-3.3.1-0-potter.img (bootloader) is-logical:recovery: not found
    Any Suggestions?
    Thanks!

    Reply
    • Selva Ganeshsays

      March 31, 2020 at 2:11 pm

      Place the recovery file inside the ADB folder and try.

      Reply
      • Ceebongosays

        March 31, 2020 at 6:20 pm

        I did – same result.
        Are you able to load potter-3.3.1-0 on Oreo 8.1?

        Reply
        • Selva Ganeshsays

          March 31, 2020 at 7:35 pm

          Try with a twrp-3.3.0-0-potter.img.

          Reply
  14. Jovaisays

    April 12, 2020 at 2:12 am

    I’m using a Moto G5 on android 6. Will this work?

    Reply
    • Selva Ganeshsays

      April 12, 2020 at 2:13 pm

      I thing you are mentioning your version wrong. G5 starts with Nougat 7.0. This method will support up to Oreo. You can do the process.

      Reply
  15. Jovaisays

    April 12, 2020 at 2:15 am

    I’m using a moto G5 running android 7, will this still work?

    Reply
  16. Akshay Ksays

    September 28, 2020 at 6:37 pm

    bro there is no ‘advanced reboot option’ in moto g5 plus what to do…?
    android 8.1

    Reply
    • Selva Ganeshsays

      September 29, 2020 at 4:05 pm

      Enable OEM Unlock and USB Debugging only.

      Reply

Leave a Reply Cancel reply

Your email address will not be published. Required fields are marked *

This site uses Akismet to reduce spam. Learn how your comment data is processed.

Primary Sidebar

Join With Us

Recent Posts

  • Realme 8 Pro will come with a 108MP Samsung ISOCELL HM2 Camera Sensor
  • Samsung Messaging App coming to Windows 10 via Microsoft Store
  • Download Samsung Galaxy M31s SM-M317F Android 11 One UI 3.0 Stock Firmware
  • Google Chat Web version now available free for Personal users
  • Backup and Web Playback are now available in Google Recorder Pixel Android App

Today Tip

Realme 8 Pro 108MP camera official announcement

Realme 8 Pro will come with a 108MP Samsung ISOCELL HM2 Camera Sensor

Realme is doing great in balancing price, design, and Specs. In terms of Price and Design, it makes … [Read More...] about Realme 8 Pro will come with a 108MP Samsung ISOCELL HM2 Camera Sensor

Advertisement

Copyright © 2021 AndroidInfotech.com, All Rights Reserved, Android is a trademark of Google Inc. All contents on this blog are copyright protected and should not be reproduced without permission.

  • Subscribe
  • Sitemap
  • About Us
  • Contact Us
  • Privacy Policy
  • Disclaimer
  • Our Image License
  • Hosted on Google Cloud
  • Ad Partner Ezoic