• Skip to primary navigation
  • Skip to main content
  • Skip to primary sidebar
Android Infotech

Android Infotech

Android Tips, News, Guide, Tutorials

  • Applications
  • Knowledge
  • I’m Bored
  • Opinion
  • Tutorial
  • Root
  • Firmware
  • Daily Deals
Home » Root » Root Moto G6 and G6 Plus Pie 9.0 using TWRP and Install Magisk (XT1925, XT1926)

Root Moto G6 and G6 Plus Pie 9.0 using TWRP and Install Magisk (XT1925, XT1926)

Last updated on April 20, 2019 By Selva Ganesh57 Comments

Moto G6 and G6 plus devices received Pie update after the default Oreo version of the devices. Here we are going to root the pie version. Compare with other manufacturers; you should get unlock data code from Moto, Before Unlocking Bootloader. Without unlocked Bootloader, we can’t root our device. So, To avoid confusion, we differentiate each step. So, there will be Major three steps- Unlock bootloader, TWRP Flash, Root files Flash using TWRP. But, Before doing all this, you should ask yourself, you need Root? If you are clear in your decision, you can move to the article.
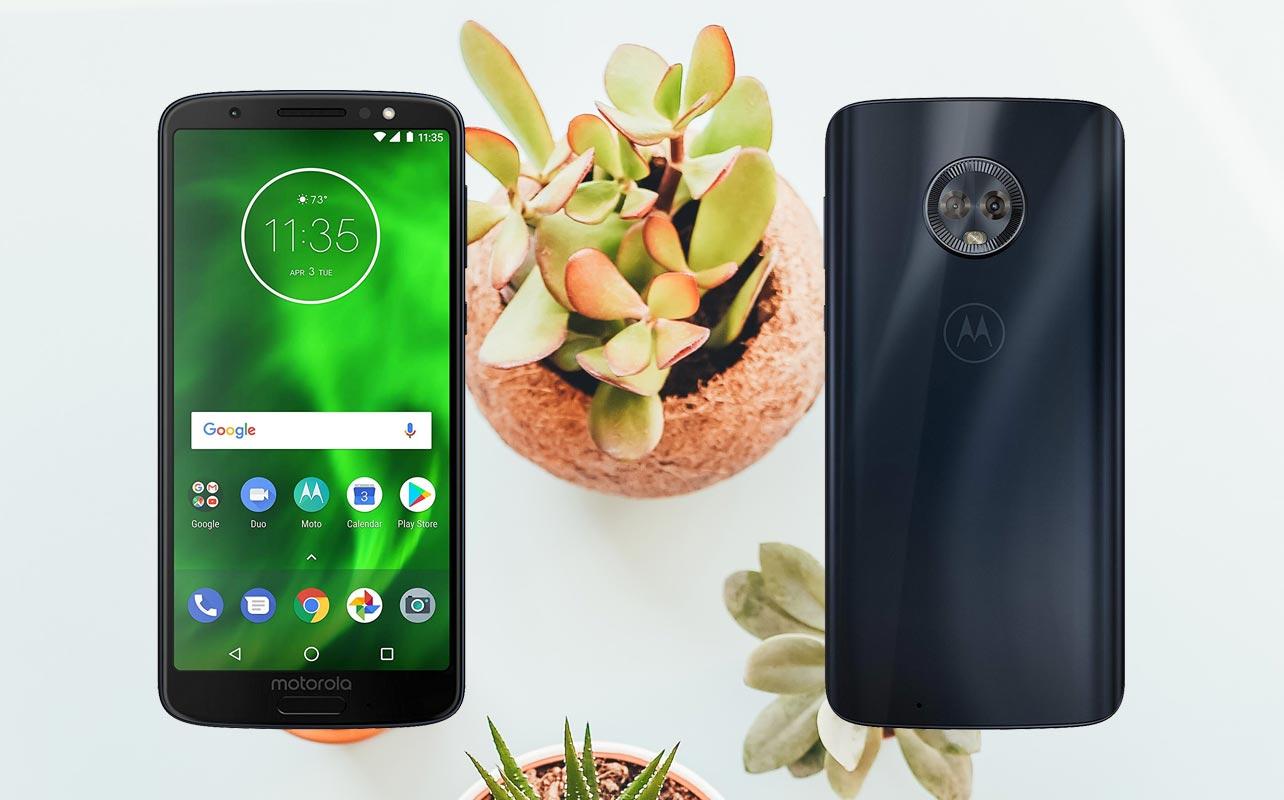
Moto G6 Plus with Small Plants

Table of Contents

  • Why should you Root Moto G6 and G6 Plus?
  • How to root Moto G6 and G6 Plus Pie 9.0
    • Things to check out for;
    • Pre-Requirement Steps
    • Unlock Bootloader using ADB and Fastboot
    • Flash TWRP
    • Install Magisk and no verity in your Moto G6/G6 Plus using TWRP
  • What More?

Why should you Root Moto G6 and G6 Plus?

You should have a proper reason, and you know what you are doing. Yes, with a Minimum of 4 GB RAM and Mid-Range Qualcomm Snapdragon processor, You can use this mobile without root for 2-3 Years If you use correctly. Software is better compared with other manufacturers Custom skin OS. Don’t root because everybody is saying when root your mobile it can become the fastest car in the world. No. Rooting is to extract some performance from the device. But, you already have Powerful specs and software. So, If you are addicted to some root apps, you can root. But, if you want to test, I won’t recommend it.

How to root Moto G6 and G6 Plus Pie 9.0

Moto G6/ G6 Plus International Variants comes with a flexible bootloader other than some carrier locked devices. This means that different smartphone variants can be easily rooted. Also, the device can accept to install TWRP recovery or any other custom recovery file/app alike.

TWRP recovery is a custom recovery file which must be installed on your devices because you can root them successfully. In this article, we explained the easiest method to follow and install TWRP recovery on Moto G6 and G6 Plus. However, the tool required for rooting this device is the Magisk App.

With the help of TWRP Recovery, you can quickly flash the latest version of Magisk into your Moto G6/ G6 Plus to gain root access. Before sharing the tutorial, you may want to know that, with the TWRP recovery present on your device, you can easily install any custom ROM or firmware. Does it seem complicated? Relax, everything will be explained succinctly in bullets.

Things to check out for;

  • Make sure your device battery is charged above 50%

  • Backup your current files and data, full data loss process (save them on external storage).

Pre-Requirement Steps
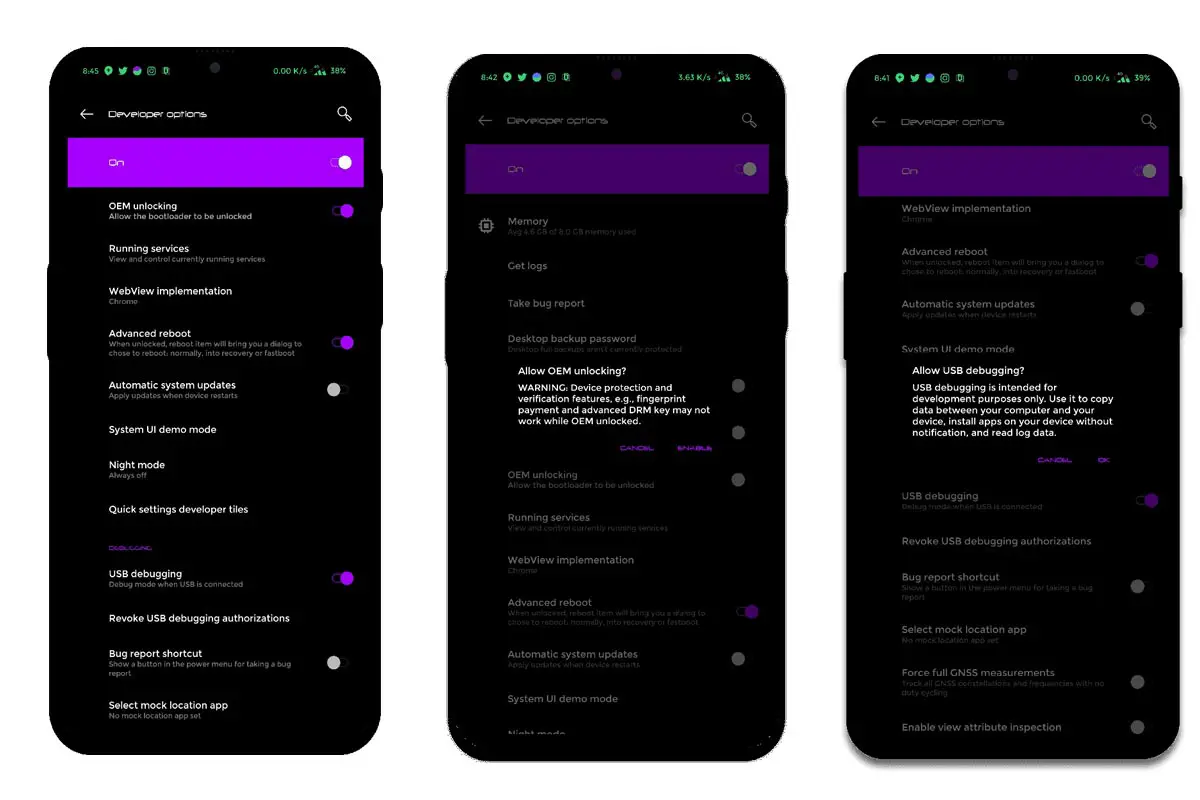
OnePlus 6T OEM Unlock and USB Debugging


  • Enable USB Debugging Mode and OEM Unlock in your mobile. To do this; go to settings >>> about >>> Tap on the “Build Number” 7-10 times consistently to enable “Developer Options,” then go to the “Developer Options” and enable USB Debugging Mode, OEM Unlock and Enable the ‘Advanced Reboot.’ There is no complicated process in Moto G6/G6 Plus.

  • Download and install the Moto USB driver to your computer system.

  • Also, download the ADB drivers. Install It in your PC.

  • Download Magisk.Zip (Latest Version) and Copy it to Your Phone Memory.
  • no-verity-opt-encrypt Download (Latest Version) and Copy it to Your Phone Memory. This file helps you to maintain the Bootloader unlock in your device.
  • Download and save the TWRP File in your Internal Memory and rename it to recovery.img.

  • twrp-3.3.0-0-ali.img (Moto G6)
  • twrp-3.3.0-0-evert.img (Moto G6 Plus)

Unlock Bootloader using ADB and Fastboot
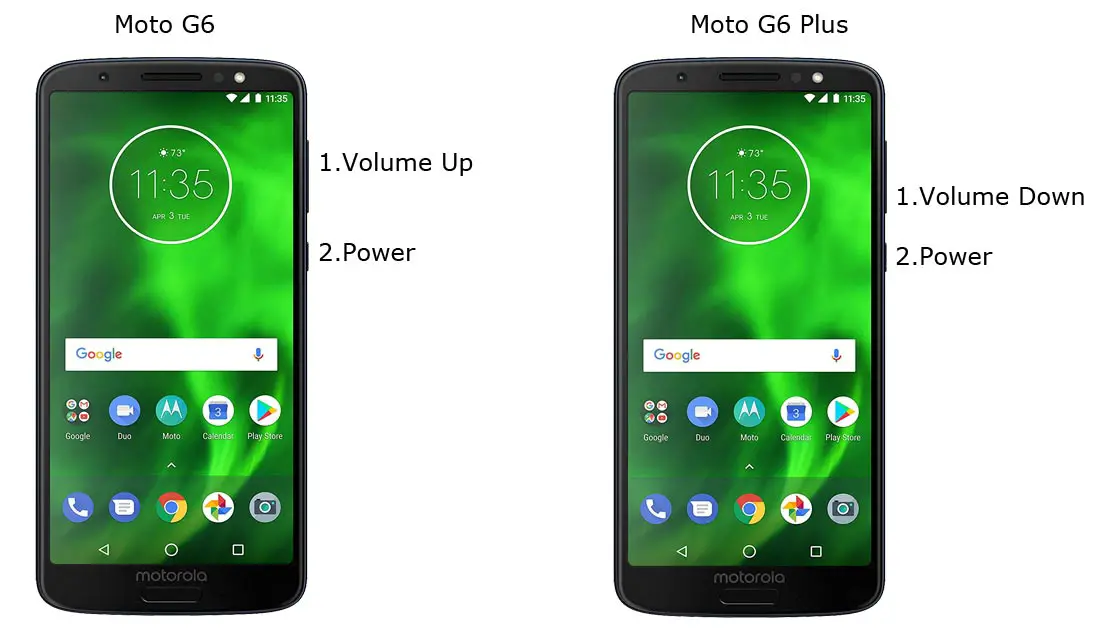
Moto G6 and G6 Plus Download Mode


  • Switch off your device. Then, enter into Fastboot mode. To do this; For Moto G6 Devices- Press and hold down the Volume Up + Power buttons at the same time for some time. For Moto G6 Plus devices- Volume Down + Power.
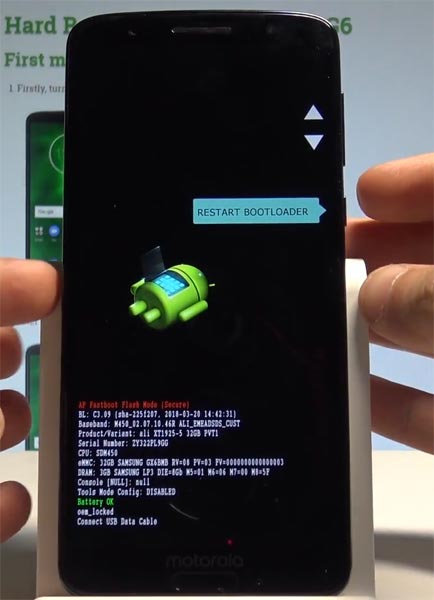
Moto G6 Plus Fastboot Mode Warning Screen


  • Press the Volume Up button to continue when you see the warning message.

  • Now, connect the Moto G6/G6 Plus mobile to the computer via USB cable.

  • Launch the fastboot on your computer. Open a Command prompt on your PC and type below command.

  • fastboot devices
  • It should display the connected devices. If you didn’t get the device, restart the command prompt and Disconnect and Connect your Moto G6/G6 Plus. If you are detected type below commands.
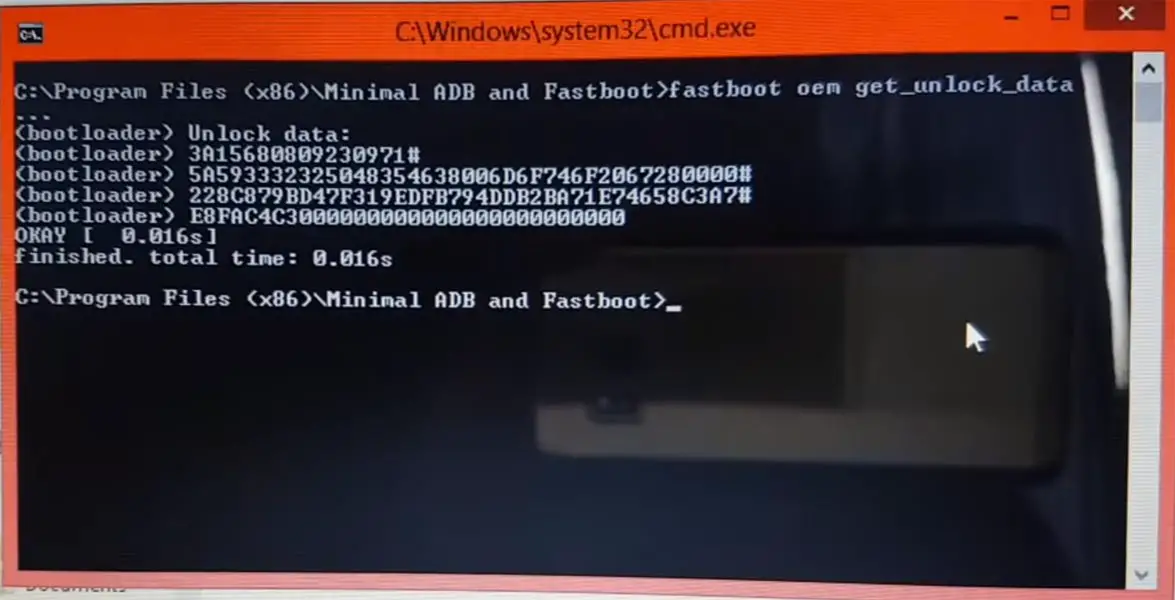
  • fastboot oem get_unlock_data

Moto Get Unlock Data


  • Hit enter, you will get some unlock data. Copy those codes and remove <bootloader> Prefix from those lines and copy them into one single line.
  • Go to Official Moto Unlock Page. Log in with your moto account and in the Box, Paste those codes and Check the unlock Bootloader Status. If you get, Yes you can unlock, You can request unlock Key from Moto.
  • After the process complete, you will get 20 Digit to unlock key in your email. Now type the following command to unlock bootloader in your device.

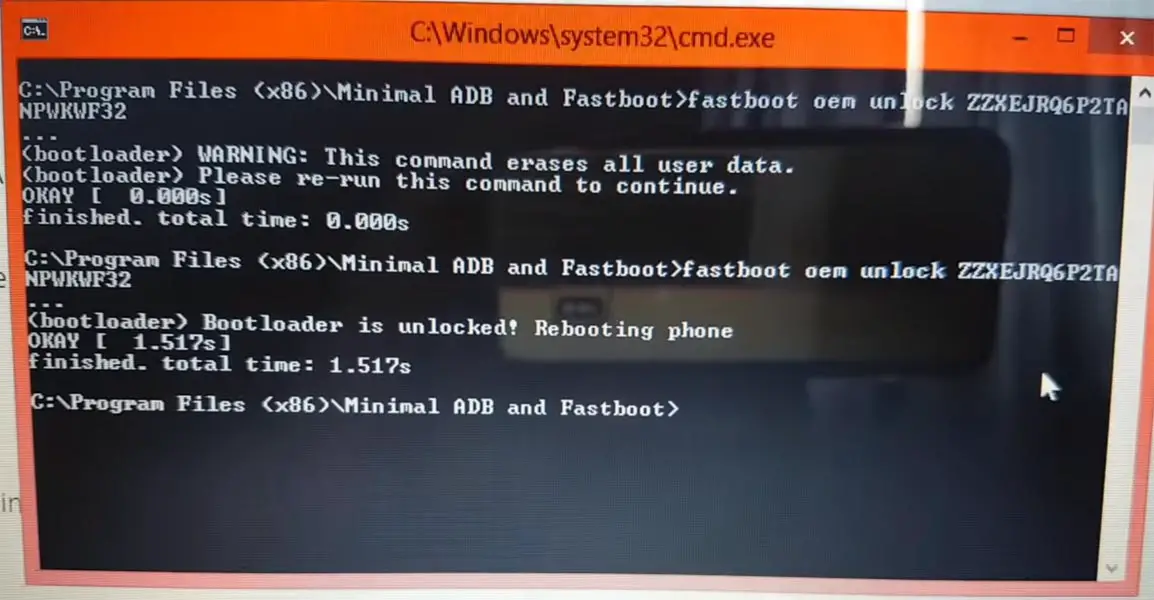
  • fastboot oem unlock UNIQUE CODE

Moto unlock bootloader command

  • You should type this code two times and Hit enter to unlock your device successfully. After the successful unlock your device will automatically reboot to the standard OS.

  • Check again enable “Developer Options,” then go to the “Developer Options” and enable USB Debugging Mode, OEM Unlock and Enable the “Advanced Reboot.” Sometimes they disabled them self after the boot.

Flash TWRP

  • Switch off your device. Then, enter into Fastboot mode. To do this; press and hold down the Volume Up+ Power buttons (Moto G6), Volume Down + Power (Moto G6 Plus) at the same time for some time.
  • Press the Volume Up button to continue when you see the warning message.

  • Now, connect the Moto G6/G6 Plus mobile to the computer via USB cable.

  • Launch the fastboot on your computer. Open a Command prompt on your PC and type below command.

  • fastboot boot twrp recovery.img
  • After the process complete, It will boot into the temporary TWRP. Don’t Boot into standard OS until we flash magisk.

Install Magisk and no verity in your Moto G6/G6 Plus using TWRP

  • Select Wipe->Advance Wipe->Select Cache Data.
  • Return to Home of TWRP select Install.
  • Select Magisk.Zip.
  • Again Return to Home of TWRP select Install.
  • Select no-verity-opt.Zip.
  • After the Installation Reboot Your Mobile.
  • You can also install Magisk Manager in your Mobile Applications.

What More?

Moto G6/G6 Plus has a minimum of 4 GB RAM, and it is a Good software side phone; There are Major regular updates and monthly updates, from Motorola for a long duration. So, if you are sure about what you are doing, you can root your device. If you accidentally bricked your device during the Root process, you can recover your device by flashing Stock Firmware- Moto G6 Pie and Moto G6 Plus Pie.

Selva Ganesh

Selva Ganesh is a Chief Editor of this Blog. He is a Computer Engineer, An experienced Android Developer, Professional Blogger & addicted Web Developer. He runs Android Infotech which offers Problem Solving Articles around the globe.

Related Posts:

  • Check My Phone is Carrier Unlocked or Not and Unlock legally for Free
  • Root Samsung Galaxy Tab S5e SM-T720 Android 10 using TWRP and Magisk
  • Deal With Low Internal Storage Space in Android Mobiles
  • Root Motorola One Vision Android 10 using TWRP and Install Magisk
  • Root Samsung Galaxy J7 Refine 2018 SM-J737P Oreo 8.0 using…
  • Root Samsung Galaxy J4 Plus SM-J415F/FN/G/GN Pie 9.0 using…
Share This Post:

Tagged With: Motorola

Reader Interactions

Comments

  1. Ginushusays

    June 13, 2019 at 1:08 pm

    Hi, how can I install the stock 8.0 on Moto G6?
    Thanks

    Reply
    • Selva Ganeshsays

      June 13, 2019 at 8:53 pm

      If you have TWRP Installed, Install using TWRP. If you didn’t have TWRP flash using ADB sideload method.

      Reply
  2. DDsays

    July 10, 2019 at 5:11 am

    Hi there. I’ve tried hard to follow this to root my G6 Plus. I hit two problems. 1. I cannot flash TWRP, only boot using it. Then I managed to install Magisk as above, but the second problem I hit is when trying to install No verity v6.0. I get the “Update process ended with ERROR:1
    Error installing zip file”. Please, can you comment/assist? Thanks

    Reply
    • Selva Ganeshsays

      July 10, 2019 at 1:22 pm

      Thank you for your detailed feedback. You should flash Magisk.zip in the first recovery boot. Or Else you will lose TWRP access.

      Reply
      • Prasoon Srivastavasays

        September 12, 2019 at 2:59 pm

        me also getting same error 1 … kindly help

        Reply
  3. androidNewbsays

    July 11, 2019 at 3:59 am

    Hello,
    Thank you for your description, but it has not worked for me.
    1. In the developer options, there is no field called “advanced reboot.”
    2. Unlocking the Bootloader worked fine.
    3. Flashing TWRP does not work. When I type in: “fastboot boot twrp recovery.img” the following message appears:
    “C:\Users\xxx>fastboot boot twrp recovery.img
    cannot load ‘twrp’: No such file or directory.”

    and I think my computer does not correctly notice the device in fastboot mode

    Do you have any further suggestions? Thank you!

    Reply
    • Selva Ganeshsays

      July 11, 2019 at 6:17 am

      Copy your TWRP file to the Fastboot directory. Both should be in the same directory.

      Reply
      • Prasoon Srivastavasays

        September 12, 2019 at 10:15 am

        after booting in twrp is asking for password please help fast

        Reply
        • Selva Ganeshsays

          September 12, 2019 at 12:21 pm

          Password is your mobile Security PIN. You set this in your Mobile Settings as a Screen Lock PIN or Backup PIN.

          Reply
          • prasoonsays

            April 9, 2020 at 12:34 pm

            THANKS.
            Don’t know what happens in the middle while installing.
            But now when I am trying all these steps again…
            while I connect my moto g6 XT1925-13
            my pc says the USB is malfunction ….

            what to do plz help

          • Selva Ganeshsays

            April 9, 2020 at 9:22 pm

            Try with different ports and USB cable.

      • NuviAndroidsays

        November 10, 2019 at 11:38 pm

        I have the same problem. How do I copy the TWRP file to the fastboot directory? I already copied it into the internal memory of the phone, and it doesn’t work

        Reply
        • Selva Ganeshsays

          November 11, 2019 at 9:00 am

          Rename the TWRP recovery file and copy this file to ADB and Fastboot PC Folder. Not a Mobile folder.

          Reply
  4. Shimonsays

    October 5, 2019 at 7:45 am

    Thanks for this Dude. I have two issues right at the start,
    1) Can’t see ‘Advanced Reboot’ in Developer Options.
    2) Moto USB driver will not install on my PC (64-bit Windows 10 Pro) with the initial error “the parameter is incorrect” when it starts to install, then after press OK and Start, it pops up a Visual C++ runtime error.

    Reply
    • Selva Ganeshsays

      October 5, 2019 at 7:46 pm

      No Need to worry about Advanced Reboot. Coming to USB Driver, Copy this file to “C” drive n your PC and Run As Administrator.

      Reply
      • Shimonsays

        October 8, 2019 at 4:47 pm

        Thanks that helped, but now I’m stuck between the TWRP & Magisk stages.

        1) where you say Select Wipe-> Advance Wipe-> Select Cache Data – do you mean to check both boxes to wipe ‘cache’ AND ‘data,’ or just ‘cache’?

        2) even when I wipe cache, after that, when I get to the TWRP Install stage, I can see the file system, but I cannot find the phone’s regular folders. I saved everything into a folder I called g6root, but I can’t see that folder in the tree. Sorry, I’m a newb at this!

        The phone is Australian moto G6 model XT1925-7, Android Pie.

        Reply
        • Selva Ganeshsays

          October 8, 2019 at 7:28 pm

          Cache and Data. Don’t Delete System. It will Wipe your OS. Data means your user data. So, Take Complete backup before Dong this. You have to set up like a New Device After Root. Without Deleting Data We can do that. But, most of the time it makes some issues.

          Reply
          • Shimonsays

            October 9, 2019 at 5:35 pm

            OK, thanks, Selva, and for the answer to my 2nd question, I figured out that I needed to store the zip files on SD CARD memory! As I can’t see them if I store them on phone memory as it says in instructions. So after using the SD card, I installed Magisk, no problem.

            But I still had a problem installing no-verity-opt-encrypt, it would not install, with an error. I saw on another post you advised to copy it from the SD card to the “root” folder and install it from there instead. But sadly, this did not work for me; I still got the “ERROR: 1” every time. I even tried an earlier version but no luck, What is the secret?

            Finally, I don’t know why every time of recovery.img loads it asks for a password – is this crucial, or can one just back out of it? As it never accepts my phone PIN.

          • Selva Ganeshsays

            October 9, 2019 at 7:33 pm

            If you set a Screen lock, TWRP will ask for the password if you can’t Install no-verity, No problem. It is used to avoid some encryption issues on the new firmware. It is like the Optional step.

      • Ednaldosays

        November 17, 2019 at 4:41 pm

        Bom dia guerreiro observei que você da um suporte técnico para quem tem dificuldade em instalar twrp tenho passado por este problema quando instalo o arquivo zip twrp fica em loop infinito e volta para o mesmo o meu aparelho é o moto G6 plus não consigo fixar o twrp assim fico tendo a necessidade de acessá-lo pelo PC se puder me ajudar agradeço desde já

        Reply
        • Selva Ganeshsays

          November 17, 2019 at 7:27 pm

          Claro .. 🙂 Você teve um problema no bootloop, após o flash TWRP, ou instalação do Magisk?

          Reply
  5. Mike Lawsays

    October 8, 2019 at 9:07 am

    I need the no verity boot for Android 9 pie. The link you gave is for oreo. I have an unlocked bootloader, installed twrp, & flashed magisk. I’ve tried everything regarding the no verity boot, but I get soft bricked or boot loop every time. I have to flashback to stock and try again, again, and back. Still no luck. I have Moto g6 xt1925-6 and running Android 9 pie. Build PPS29.118-15-11. Thanks in advance! Please help me before I smash this phone.

    Reply
    • Selva Ganeshsays

      October 8, 2019 at 10:58 am

      You have one of the best Moto Phones. Don’t Smash that..:). Try with no-verity-opt-encrypt; I attached the link below. Remember, you should flash the Magisk in the first boot. Don’t boot into the standard OS.

      http://www.androidinfotech.com/no-verity-opt-encrypt-versions/

      Reply
  6. Narayanansays

    October 17, 2019 at 6:30 pm

    I am having XT1925-13 (Moto G6 ALI) with build ppss29.55-34 (Pie). When I tried the above steps many times, I either end up with a boot loop or TWRP being switched automatically to stock recovery.

    Since I tried rooting on my daily use phone, I had to stop the rooting and started using after spending my weekend. As of now, the phone does not have TWRP installed. First question: If I want to achieve installing TWRP first, what steps I should follow. Once TWRP is installed permanently, I will take the next step towards rooting. Many thanks for your blog.

    Reply
    • Selva Ganeshsays

      October 17, 2019 at 7:30 pm

      First of all, thank you so much for giving this many details. The problem is, After the flash, your first Boot should be into TWRP. You have to Ceal Cache and Flash no-verity to avoid encryption issues, that made the boot loop problems. After that, Flash Magisk. This process should be one go. IF you accidentally boot into the standard OS, you will lose TWRP. After flashing Magisk, your TWRP will be permanent.

      Reply
      • Narayanansays

        October 20, 2019 at 6:53 pm

        Thanks for your response. I downloaded the factory image “ALI_RETAIL_9.0_PPS29.55-34_cid50_subsidy-DEFAULT_regulatory-DEFAULT_CFC.xml.zip” and flashed it first. The mobile restarted and went to the first screen to select a language. I rebooted it into bootloader, ran the TWRP as a temp by command “fastboot boot twrp-3.3.0-0-Ali.img,” which asked for the password. I pressed cancel, and then I wiped cache and data. Via ADB I transferred “adb push Magisk-v20.0.zip /sdcard” and “adb push no-verity-opt-encrypt-6.1.zip /sdcard”. Then from TWRP, I installed Magisk. Then when installing no-verity, it gave an error “updater process ended with an error: 1 error installing zip file ‘no-verity-opt-encrypt-6.1.zip’. Rebooted the device with hope and ended in a boot loop. Restored the factory image “ALI_RETAIL_9.0_PPS29.55-34_cid50_subsidy-DEFAULT_regulatory-DEFAULT_CFC.xml.zip” to start receiving calls.

        Any idea what is going wrong? Thanks for your time.

        Narayanan

        Reply
        • Selva Ganeshsays

          October 21, 2019 at 11:26 am

          Change the Order. Flash no-verity first and then Install Magisk. Or Try to flash only Magisk. no-verity is a precaution step to avoid boot loop issues. If It is the reason, We can skip this step.

          Reply
  7. Narayanansays

    October 22, 2019 at 3:22 pm

    Sorry, It did not work.

    I rebooted it into bootloader, ran the TWRP as a temp by command “fastboot boot twrp-3.3.0-0-Ali.img,” which asked for the password. I pressed cancel, and then I wiped cache and data. Via ADB I transferred “adb push Magisk-v20.0.zip /sdcard”. Then installed with TWRP Magisk and rebooted the device, ended in boot loop 🙁

    Reply
    • Selva Ganeshsays

      October 22, 2019 at 6:48 pm

      Use Magisk 19.4 version. 20.0 is supporting up to Android 10. Sometimes High-End version can cause problems.

      Reply
      • Narayanansays

        October 28, 2019 at 5:45 pm

        Thanks for your efforts, though. Planned to drop rooting 9.0 or downgrade to 8. Also, in a dilemma to whether wait for custom ROM for Android 10.

        Reply
    • Patros911says

      November 8, 2019 at 7:03 pm

      It must end in a boot loop when you press “cancel” and don’t enter a password to decrypt your /data partition!!! Without decrypting, you can’t install anything because it is encrypted!

      @Selva Ganesh, I don’t understand why you told him to install Magisk v19.4 instead of v20.0 in this case??

      Reply
      • Selva Ganeshsays

        November 8, 2019 at 7:25 pm

        Thank you for your Guidance Help.
        Magisk 20.0 is the first version of Android 10. It comes with small bugs, That reflect on only specific devices. It is improved in 20.1.
        19.4 is a more stable version.
        In this case, Narayanan Entered TWRP successfully. He Got Bootloop when Installing a new Magisk version. We already Installed no-verity so that the problem can be Magisk.

        Reply
        • Patros911says

          November 9, 2019 at 4:48 am

          Narayanan says October 22, 2019 at 3:22 pm:
          „…which asked for the password. I pressed cancel…“

          He entered TWRP successfully BUT he didn’t decrypt his /data partition!! He pressed “cancel” when TWRP was asking for his password. As a result of this TWRP will boot and mounts /data fully encrypted!!

          Reply
        • Siggi99+7says

          November 9, 2019 at 6:23 pm

          It would be nice not to delete my comment to help the people here!

          Yes, he entered TWRP successfully, but he didn’t decrypt his data partition. He pressed “cancel” when TWRP was asking for a password. No password = no decryption = no permission to write to /data!

          Reply
          • Selva Ganeshsays

            November 9, 2019 at 7:54 pm

            We never delete our People Comment unless they request.

  8. 119sortaPsays

    November 9, 2019 at 5:02 am

    Narayanan says October 22, 2019, at 3:22 pm:

    „…which asked for the password. I pressed cancel…“

    Do you know what that means?? TWRP will mount /data fully encrypted! You are not able to read or write /data. So the installation of Magisk will fail, and your device will be stuck in a boot loop after the next reboot.

    Reply
    • Selva Ganeshsays

      November 9, 2019 at 1:04 pm

      Sorry, I Misunderstood the query.
      You explained it very well. I hope. It will help him to avoid the Root Bootloop in the future.

      Reply
  9. Mohd Jamshedsays

    December 1, 2019 at 9:27 pm

    Hello, Sir, I Have A Issue After Update Android Oreo To Android
    Pie My Wi-Fi Not Turning On After Update Android Pie Can You
    Please Give Me Any Solution?

    Reply
    • Selva Ganeshsays

      December 2, 2019 at 11:40 am

      Take Backup. Boot into Stock Recovery, Clear Cache, and User data. Remember, Ths will wipe your all data.

      Reply
  10. Jakobsays

    December 22, 2019 at 4:04 am

    Hi Selva,
    Thank you for this information! I followed your instructions, but I am stuck in a boot loop. I think I have a similar problem, like Narayanan above. I have a Moto G6 XT1925-5 bought in Germany with android 9 (pie, newest version).
    I followed all the steps. But Can’t Install no-verity.
    Now when I boot my phone the message “Your device has been unlocked … Your device will boot in 5 seconds” appears, after 5 seconds the screen turns black for a second and the message appears again, after 5 seconds the screen turns black and so on.
    What can I do to make my phone working again?
    Thank you (and anyone else who tries to assist me) in advance, have pleasant holidays and a happy new year!

    Reply
    • Selva Ganeshsays

      December 22, 2019 at 1:09 pm

      Try this.
      Don’t Flash no-verity.
      Use the same command, fastboot boot. This time copy the TWRP.img file to SD card with magisk.
      Before flashing Magisk, When you Boot into the first boot, Go to Advance>”Install Recovery Ramdisk.” Install TWRP Image File. After this flash magisk and reboot your mobile.

      Reply
  11. pranavsays

    April 7, 2020 at 1:44 am

    Hello, my phone moto g6 after Magisk.Zip and no-verity-opt.Zip installation I am stuck on the page “Your device has been unlocked and can’t be trusted,” “Your device will boot in 5 seconds.”

    And nothing happens. How can I remove stuck?

    Reply
    • Selva Ganeshsays

      April 7, 2020 at 9:29 pm

      Boot into Recovery Backup everything. Wipe user data.

      Reply
  12. exit27says

    April 19, 2020 at 1:10 pm

    Hi.
    I’ve installed XT1925-4-PPSS29.55-37-7-6, from February 11, 2020. The only Magisk that it worked has been version 20.4 after two reboots. Don’t touch anything.
    Finally, I’ve installed app TWRP from the store, and I installed twrp 3.1.1 Ali with root permissions, and now all works usually.
    Bye.

    Reply
    • Selva Ganeshsays

      April 19, 2020 at 2:26 pm

      Sometimes the version may not be compatible with each other. That’s why we provide all versions. Great. We glad the process is worked for you.

      Reply
  13. Beccasays

    July 3, 2020 at 5:05 am

    Hi, I have the Moto XT1925-6. I love this phone btw. But I have followed your post exactly as told. Still, when I try to flash no verity opt to encrypt, it comes back with that Error 1, so I’ve read the comments. I’ve seen where you have told other people to try to flash magisk first then encrypted, so I decided that, but now when I click install, I’ve noticed my system is 0 like there’s nothing in it am I doing something wrong? And another question do superuser not work on the Moto g6 do we have to use magisk, cause I have tried SU, but it fails.

    Reply
    • Selva Ganeshsays

      July 3, 2020 at 2:50 pm

      It is an encryption error. When you place Installable Magisk files in the SD card, you will not get the error. You can skip no-verity.

      Reply
      • Beccasays

        July 4, 2020 at 12:41 pm

        I got it fixed thank you so much for your blog it’s awesome.

        Reply
        • Selva Ganeshsays

          July 4, 2020 at 1:29 pm

          We feel great for you..:)

          Reply
  14. Narayanansays

    July 22, 2020 at 8:56 am

    I should thank Selva Ganesh, who had patiently replied for my comments and issue. Also, thank for others who helped to add details. I can’t thank you enough.

    After I lived without root due to the issue in my comment, I tried to use RevengeOS for Moto g6 ALI (Android 10) and ended up with a network not working. Though I have backed up my EFS partitions, I tried many attempts to resolve the network issue.

    Now with the RevengeOS not working, I returned to stock Pie ROM downloaded from the site mentioned in the above link. I tried to build 118, which failed and then tried ALI_RETAIL_9.0_PPSS29.55-37-7-6_cid50_subsidy-DEFAULT_regulatory-DEFAULT_CFC.xml.zip, which worked. So with this, I returned to stock.

    Then for rooting, I downloaded twrp-3.3.0-0-ali.img booted into it temporarily by using command “fastboot boot twrp-3.3.0-0-ali.img” and copied the Magisk-v19.4.zip and installed.

    The device restarted successfully. Upon boot, I updated the Magisk to the latest version. Thereby I am now able to use stock with root.

    However, over some time, I am finding the phone getting sluggish when opening apps when opening the camera from other apps like WhatsApp, etc. In my experience, when I was with the stock ROM but without rooting, I did not face this lag.

    Thought to log here to help others and to thank these guys who took the time to help me and others.

    Reply
    • Selva Ganeshsays

      July 22, 2020 at 3:00 pm

      The lag may be an issue with the superuser permission. Glad you rooted your mobile.

      Reply
      • Narayanansays

        July 22, 2020 at 8:20 pm

        If the lag is for the app that requests su permission, then it might be the case. The delay will happen even for the app drawer to open the screen to show the apps sometimes. When the phone display is off, pressing the power button will not also show the display. Sometimes it will show, but it will not show the pattern dots. All these will happen if I wait for a long, really long time. The only solution for me is to restart the phone and then it will become normal.

        Suspecting this could be due to Magisk (at least in my case), I uninstalled Magisk entirely and found the issue gone. Then I installed Magisk v19.4 and did not update to 20.x even though it is prompting me often. As of now, two days are gone of regular use; su permission is granted for few apps and is working fine. No lagging or freezing so far.

        Reply
        • Selva Ganeshsays

          July 22, 2020 at 9:40 pm

          So the problem is with Magisk. Unless there is a fix, keep using the Old Magisk version and don’t update it to the latest.

          Reply
  15. Michael Palmersays

    September 18, 2020 at 2:19 pm

    Fantastic post. I was fumbling around with rooting a Moto G6 with Pie for too long when I found your post. It is a great all-inclusive tutorial, and it worked perfectly. Thanks so much!.

    Reply
    • Selva Ganeshsays

      September 18, 2020 at 2:24 pm

      Thank you so much for your feedback…:)

      Reply
  16. Leonardosays

    December 8, 2020 at 12:48 am

    this method works on XT1925-3 Android 9.0 security Patch 04/2020 ????

    Reply
    • Selva Ganeshsays

      December 8, 2020 at 2:07 pm

      It will work with the latest patch also.

      Reply

Leave a Reply Cancel reply

Your email address will not be published. Required fields are marked *

This site uses Akismet to reduce spam. Learn how your comment data is processed.

Primary Sidebar

Join With Us

Recent Posts

  • Google Nest Hub got New clock face with Time and Weather Together
  • T-Mobile Launched WFX Enterprise Unlimited Plans
  • Google Fit Heartbeat Rate and Respiratory Rate Measure Coming to Pixel Phones
  • Download Samsung Galaxy A02 SM-A022F/G/M Android 10 One UI 2.0 Stock Firmware
  • On Device SpO2 level now available in Fitbit Charge 4

Today Tip

Google Nest Hub with Clock face

Google Nest Hub got New clock face with Time and Weather Together

Popular Tech companies sometimes forgot small details that may be useful for users. So, People begin … [Read More...] about Google Nest Hub got New clock face with Time and Weather Together

Advertisement

Copyright © 2021 AndroidInfotech.com, All Rights Reserved, Android is a trademark of Google Inc. All contents on this blog are copyright protected and should not be reproduced without permission.

  • Subscribe
  • Sitemap
  • About Us
  • Contact Us
  • Privacy Policy
  • Disclaimer
  • Our Image License
  • Hosted on Google Cloud
  • Ad Partner Ezoic